
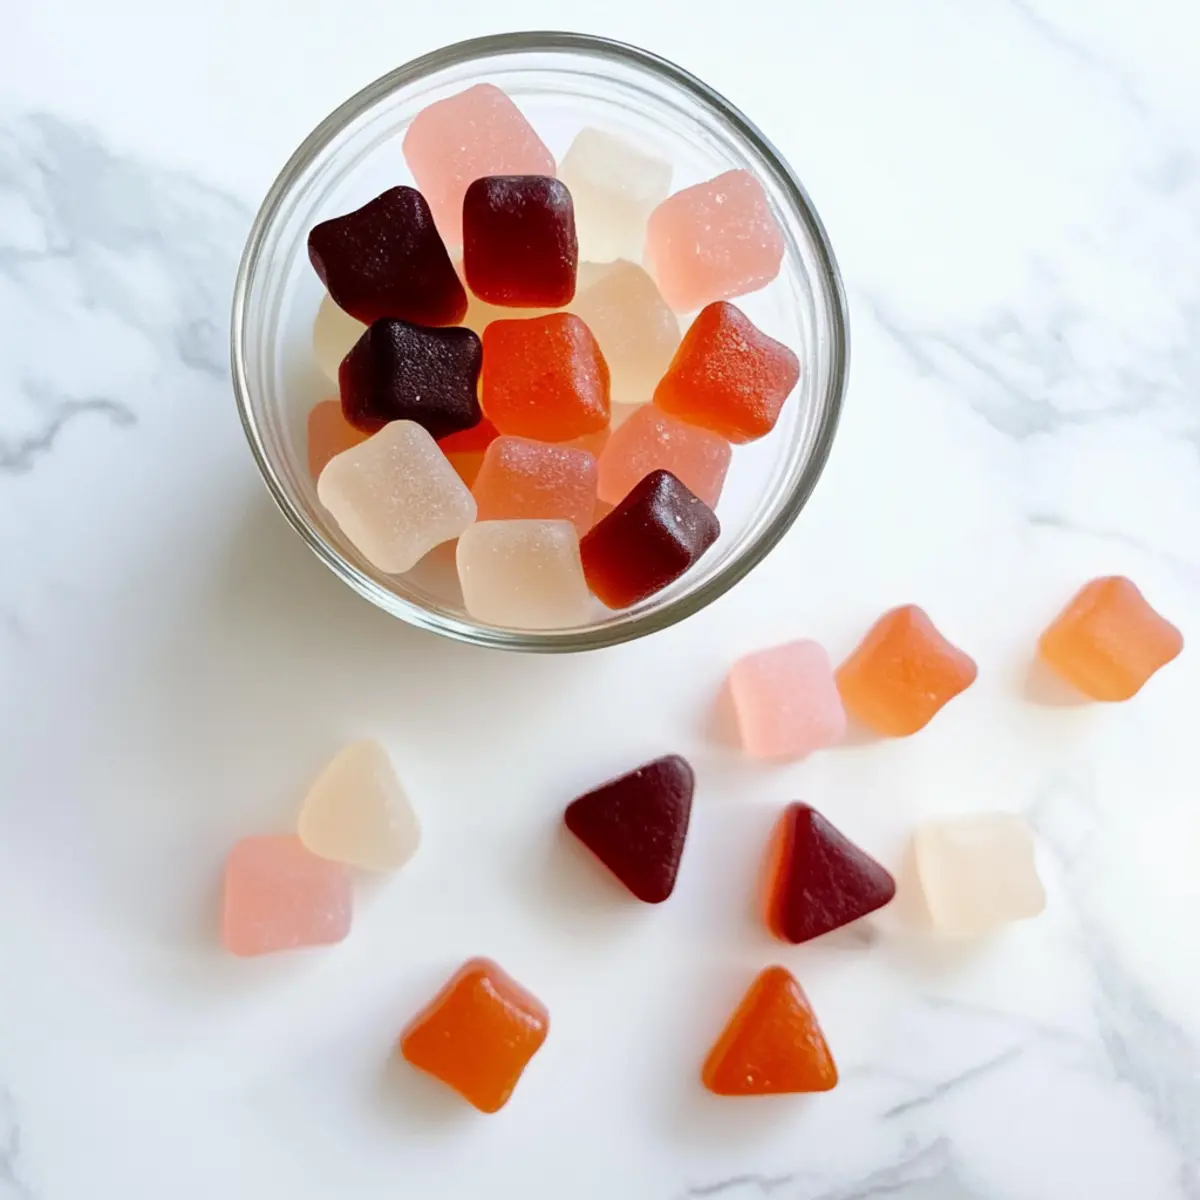
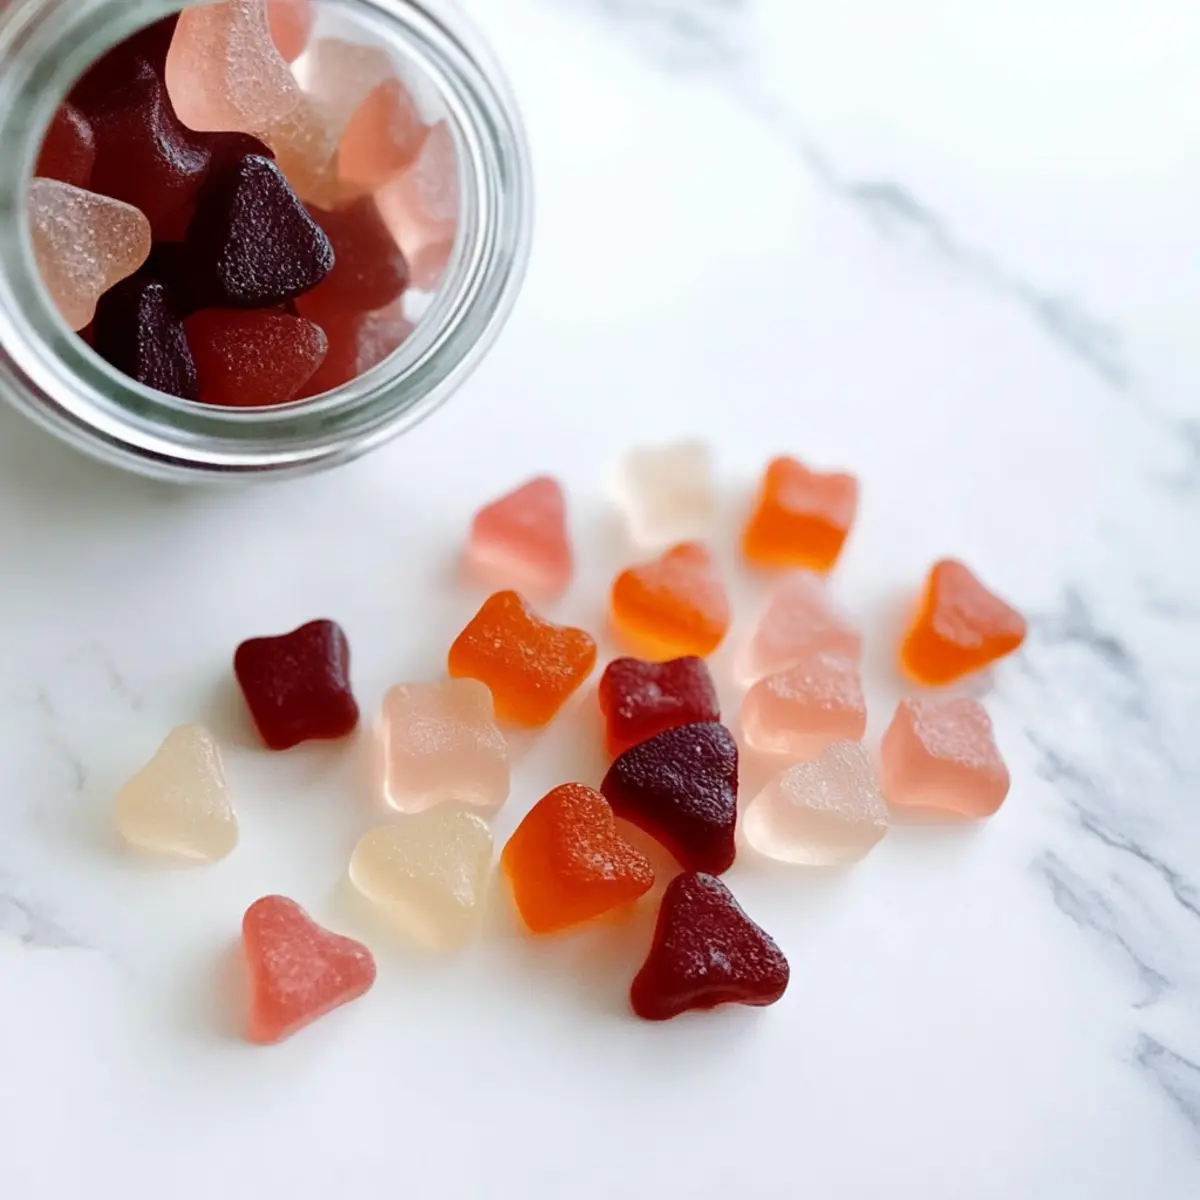
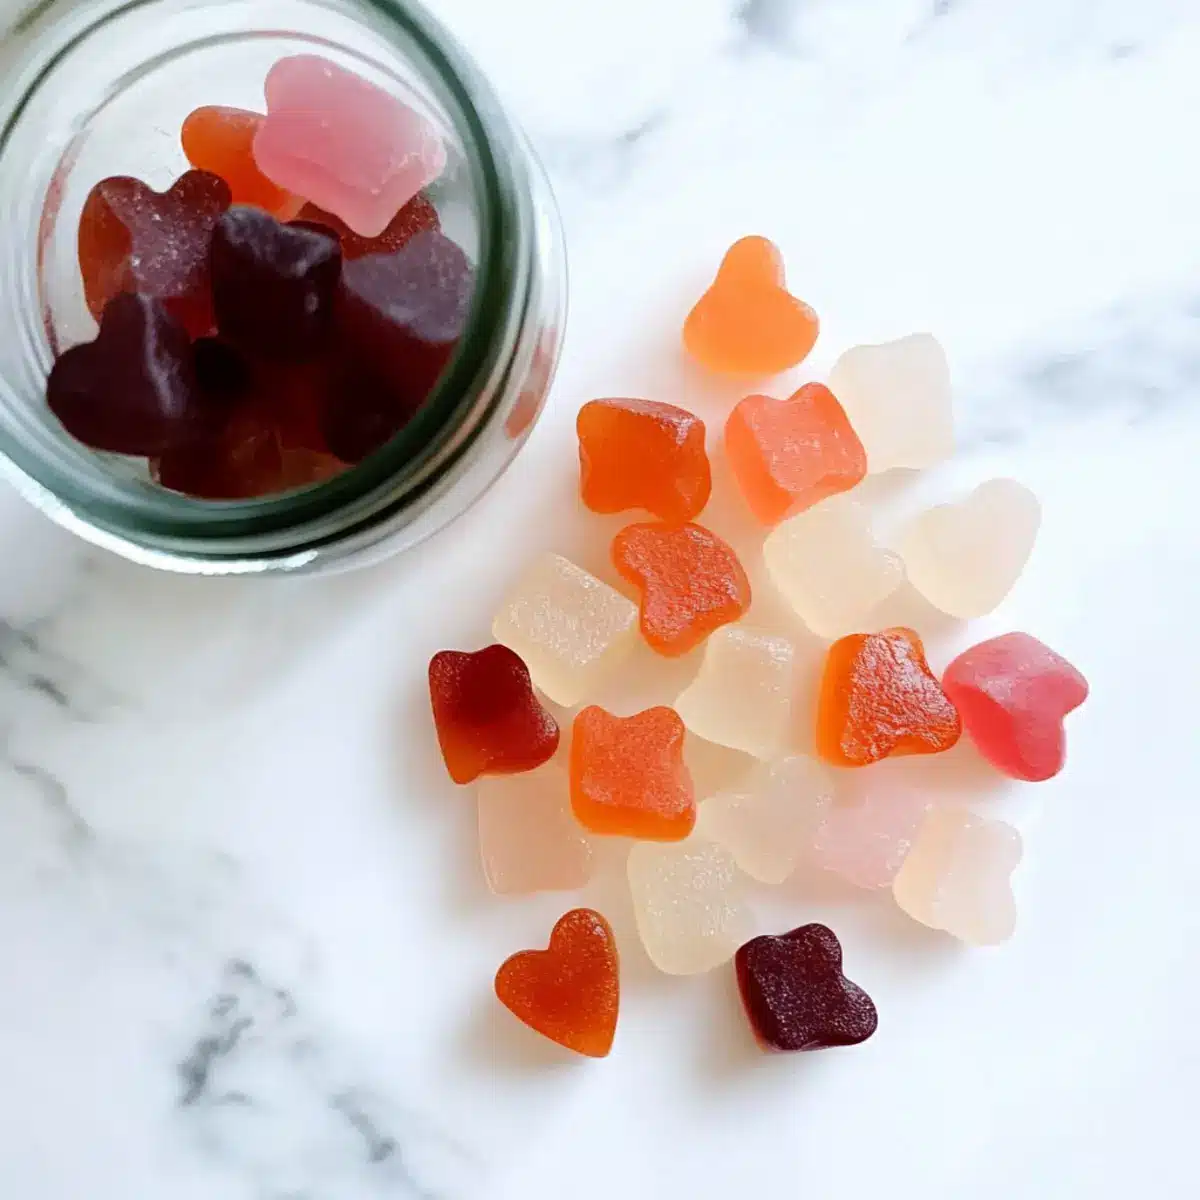
Have you ever found yourself craving a snack that not only satisfies your sweet tooth but also supports your health? Enter my Gut Healing Gummies! These vibrant treats are a delightful way to nourish your gut, crafted with just four simple ingredients, and can be made with your choice of juice—think cranberry, watermelon, or mango. The best part? They’re gluten-free, dairy-free, and perfect for anyone looking to swap fast food for something that feels indulgent yet wholesome. With a chewy texture that rivals those store-bought candies, these gummies are not just tasty; they offer a fun twist on healthy snacking. Ready to unleash your inner home chef and boost your wellness one gummy at a time? Let’s dive into this simple recipe that transforms everyday juice into a gut-friendly delight!
Why are Gut Healing Gummies so irresistible?
Healthier Alternative: These gummy treats are a fantastic way to satisfy your sweet tooth without compromising your health!
Simple Ingredients: With only four easy-to-find components, making these gummies is as enjoyable as eating them.
Flavorful Variety: Customize your gummies with a wide range of juicy options like cranberry or guava, offering endless flavor possibilities.
Nutritional Benefits: Each gummy supports digestive health while packing in vitamins A and C, ensuring you’re nourishing your body with every bite.
Crowd-Pleasing Snack: Perfect for kids and adults alike, these gummies make a delightful addition to lunch boxes or a fun post-workout treat that everyone will love.
Easy Storage: Just store these gummies in an airtight container, and you’ll have a week’s worth of tasty snacks ready to go! Feel free to check out my other recipes for healthy tech with your snacks.
Gut Healing Gummies Ingredients
Unlock the tasty magic of Gut Healing Gummies with these simple components!
For the Gummies
- Coconut oil – Grease the pan to prevent the gummies from sticking, ensuring you get perfect shapes every time.
- Juice – 4 cups, divided; this is the heart of your gummies, providing natural sweetness and vibrant flavor—just skip pineapple juice, as it won’t allow the gelatin to set.
- Gelatin (Vital Proteins recommended) – 8 tablespoons; it gives structure to your gummies and boosts gut health, but if you’re vegan, try agar agar instead (it won’t offer the same gut benefits).
For the Extras
- Optional juice variations – Get creative with your flavors using juices like cranberry, watermelon, mango, peach, or guava to bring a fun twist to your Gut Healing Gummies!
Step‑by‑Step Instructions for Gut Healing Gummies
Step 1: Grease the Pan
Start by greasing an 8″x8″ pan with a thin layer of coconut oil. Use a paper towel or your fingers to ensure the oil covers the bottom and sides. This step is crucial for preventing your delicious Gut Healing Gummies from sticking, so don’t skip it!
Step 2: Bloom the Gelatin
In a shallow bowl, sprinkle 8 tablespoons of gelatin over 3 cups of your chosen juice, making sure to cover the surface evenly. Let it sit for 3-5 minutes, allowing the gelatin to absorb the juice and thicken. You’ll know it’s ready when it resembles a gel-like consistency, which is essential for achieving the right gummy texture.
Step 3: Heat the Remaining Juice
While the gelatin is blooming, grab a saucepan and pour in 1 cup of your remaining juice. Heat it over medium-low heat, stirring occasionally, until the mixture warms but does not boil. You want it hot enough to dissolve the gelatin completely, which will enhance the flavors of your Gut Healing Gummies.
Step 4: Combine and Dissolve
Once the remaining juice is heated, slowly add the bloomed gelatin mixture into the saucepan. Stir continuously until the gelatin is fully dissolved and the mixture is smooth, which should take about 2-3 minutes. This step ensures that your Gut Healing Gummies will have that chewy, delightful texture we all love.
Step 5: Pour and Chill
Carefully pour the smooth mixture into the prepared pan, spreading it evenly. Place the pan in the refrigerator and let it chill for at least 4-5 hours, or until the gummies are firmly set. You’ll know they’re ready when they feel firm to the touch and hold their shape beautifully.
Step 6: Cut and Enjoy!
Once set, remove the pan from the fridge and use a sharp knife or cookie cutter to cut the gummies into squares or fun shapes. Store your delightful Gut Healing Gummies in an airtight container in the refrigerator, ready to enjoy as a tasty and nutritious snack throughout the week!
Gut Healing Gummies: Delicious Customization Ideas
Feel free to get creative and personalize your Gut Healing Gummies with these fun variations that cater to your taste buds!
- Juice Swaps: Use cranberry or mango juice to play with flavors. Each juice adds a unique twist while maintaining that delightful sweetness.
- Tropical Blend: Try mixing watermelon juice with a splash of coconut milk for an exotic gummy that transports you to a sunny beach. This melange offers a refreshing taste with every chewy bite.
- Shape Shifter: Use cute cookie cutters or fun molds to create gummies in various shapes. Whether stars, hearts, or animals, they make snacking even more enjoyable, especially for kids!
- Sweeten the Deal: Add a natural sweetener like honey or maple syrup to your juice mixture for an extra touch of sweetness. Just remember to taste and adjust as needed for your preferred sweetness level.
- Spice It Up: Incorporate a pinch of ginger powder for a zesty kick that complements the fruit flavors beautifully—perfect for soothing your tummy and enhancing your gut health!
- Herbal Infusion: Try infusing the juice with a few leaves of fresh mint or basil before mixing for a refreshing twist. Strain the herbs, and your gummies will be as vibrant in flavor as they are in color.
- Nut-Free Boost: Feeling adventurous? Add a tablespoon of chia seeds for a slight crunch and an extra boost of nutrition. They blend well with the gummy texture, making your treats even more wholesome.
- Zing it Up: If you’re up for a little heat, include a dash of cayenne pepper in your juice blend. This unexpected kick adds depth to the sweetness while supercharging your metabolism.
These variations let you tailor your Gut Healing Gummies just the way you like them! And if you’re looking for more healthy snack ideas, why not check out my tasty fortified smoothie recipes or the super easy no-bake energy bites? Enjoy your gummy-making adventure!
How to Store and Freeze Gut Healing Gummies
Fridge: Store your Gut Healing Gummies in an airtight container in the refrigerator for optimal freshness, enjoying them within 7 days for the best taste and texture.
Freezer: If you wish to keep them longer, freeze the gummies in a single layer on a baking sheet before transferring them to an airtight container or freezer bag. They’ll last up to 3 months!
Reheating: When ready to enjoy your frozen gummies, simply thaw them in the fridge or at room temperature; they’re quick to regain their chewy goodness.
Serving Advice: Refresh your gummies by giving them a light shake of powdered sugar or cornstarch before serving to prevent clumping; perfect for sharing or keeping just for you!
Expert Tips for Gut Healing Gummies
• Blooming Gelatin: Ensure to properly bloom the gelatin for a smooth texture; this step is crucial for achieving the delightful chewiness of your Gut Healing Gummies.
• Juice Selection: Experiment with various juices for unique flavors, but avoid pineapple juice as it prevents gelatin from setting properly.
• Silicone Molds: Using silicone molds can create fun shapes; however, they may make it harder to release the gummies. Grease them well!
• Refrigeration Time: Be patient and allow at least 4-5 hours for the gummies to set perfectly; cutting them too soon can ruin the texture.
• Storage Tips: Keep the gummies in an airtight container in the fridge and consume within a week for the best taste and quality!
Make Ahead Options
These Gut Healing Gummies are perfect for meal prep enthusiasts! You can bloom the gelatin and prepare the juice mixture up to 24 hours in advance, giving you a head start on your healthy snacking routine. Simply follow steps 1 and 2, and then refrigerate the bloomed gelatin mixture until you’re ready to heat the juice and combine (step 3). This not only saves time but also ensures your gummies maintain their delightful texture when finished. When you’re ready to serve, heat your remaining juice, mix it with the bloomed gelatin, chill, and enjoy your scrumptious, gut-friendly gummies throughout the week!
What to Serve with Gut Healing Gummies?
These delightful treats can shine even brighter when paired with complementary flavors and textures.
- Fresh Fruit Salad: A mix of berries and citrus adds a refreshing touch, enhancing the fruity flavors of the gummies.
- Nutty Granola: This crunchy addition offers a satisfying contrast to the chewy gummies, making for an energizing snack.
- Yogurt Parfait: Layer your gummies with yogurt and granola for a creamy, nutritious breakfast that feels indulgent.
- Herbal Tea: A warm cup of chamomile or peppermint tea soothes the stomach and pairs beautifully with these gummies.
- Coconut Water: Hydrating and subtly sweet, coconut water complements the tropical vibes of the fruit juices used.
- Peanut Butter Dips: A dollop of creamy peanut butter creates an irresistible combination of sweet and savory flavors.
- Dark Chocolate: A small piece of dark chocolate serves as a decadent treat that heightens the experience of enjoying these wholesome gummies.
- Cheese Plate: Soft cheeses like goat cheese can add a tangy balance to the sweetness of your gummies.
- Sparkling Water: A refreshing, bubbly drink that adds a fun and fizzy contrast to the chewy texture of the gummies, making your snack time feel festive!

Gut Healing Gummies Recipe FAQs
What juice should I use for the gummies?
You can use a variety of juices such as cranberry, watermelon, mango, peach, or guava to flavor your Gut Healing Gummies. Just avoid pineapple juice, as it doesn’t allow gelatin to set properly.
How should I store my Gut Healing Gummies?
Store your Gut Healing Gummies in an airtight container in the refrigerator for optimal freshness. They’re best enjoyed within 7 days for the finest taste and texture, so keep an eye on them!
Can I freeze Gut Healing Gummies?
Absolutely! To freeze your gummies, lay them out in a single layer on a baking sheet and freeze until solid. Then, transfer them to an airtight container or freezer bag. They’ll last up to 3 months in the freezer and can quickly regain their chewy texture once thawed!
How can I troubleshoot if my gummies turn out too soft?
If your Gut Healing Gummies are too soft, it’s a sign that the gelatin didn’t bloom properly or the ratio of gelatin to juice was off. Make sure to sprinkle the gelatin evenly over the juice and allow it to absorb for 3-5 minutes without stirring. If needed, you can reheat the mixture gently and add another tablespoon of gelatin to firm them up. Just remember, patience is key!
Are Gut Healing Gummies suitable for allergies or dietary restrictions?
Yes! These Gut Healing Gummies are gluten-free, dairy-free, egg-free, and nut-free, making them suitable for a variety of dietary needs. If you’re vegan, consider using agar agar as an alternative to gelatin, but note that it doesn’t provide the same gut health benefits.
How can I ensure my gummies have the right texture?
To achieve that perfect chewy texture, make sure to bloom your gelatin correctly and combine it with heated juice until fully dissolved. Take your time during each step, and don’t rush the refrigeration process—allow at least 4-5 hours for them to set properly!
Gut Healing Gummies for a Tasty Digestive Boost
Ingredients
Equipment
Method
- Grease an 8'x8' pan with coconut oil using a paper towel or fingers.
- In a shallow bowl, sprinkle gelatin over 3 cups of chosen juice and let it sit for 3-5 minutes.
- Heat 1 cup of remaining juice in a saucepan over medium-low heat until warm but not boiling.
- Combine the bloomed gelatin with the heated juice, stirring continuously until dissolved.
- Pour the mixture into the prepared pan and refrigerate for 4-5 hours until set.
- Cut the set gummies into squares or shapes and store in an airtight container.
Leave a Reply