
As I threw together a last-minute snack, the tantalizing aroma of melting chocolate wafted through my kitchen, instantly transporting me to my favorite dessert memory—a gooey, indulgent treat enjoyed without a hint of guilt. That’s precisely what you’ll experience with these delightful Chocolate Peanut Butter No Bake Bars. In just 15 minutes, you can create a quick, healthy dessert that’s both gluten-free and vegan, making it a perfect option for everyone. With every bite, you’re savoring rich chocolate paired with creamy peanut butter, a combination that’s undeniably addictive yet nutritious. They’re not only a sweet reward after a long day but also a go-to for satisfying those pesky cravings without falling back on fast food. Curious how to whip up this heavenly treat? Let’s dive into the recipe!
Why Choose Chocolate Peanut Butter Bars?
Quick and Easy: You can whip these bars up in just 15 minutes, perfect for those busy days when you crave something sweet.
Guilt-Free Indulgence: Made with wholesome ingredients like gluten-free oat flour and natural peanut butter, these bars are both satisfying and nutritious.
Versatile Treat: Easily customize flavors by switching to almond flour or adding a pinch of sea salt for an extra kick, ensuring there’s a version for everyone.
Crowd Pleaser: Ideal for gatherings! Colorful, delicious, and fun, they’re sure to impress guests or delight your family after dinner.
If you’re in the mood for another healthy dessert, try making these delicious Garlic Butter Shrimp Pasta next!
Chocolate Peanut Butter No Bake Bars Ingredients
For the Base
• Natural Peanut Butter – Acts as the primary flavor and binding agent. Substitution: Any nut or seed butter, like almond or sunflower seed butter, can be used.
• Gluten-Free Oat Flour – Provides structure; easily made by grinding gluten-free oats in a food processor. Substitution: Almond flour can be used for a grain-free option.
• Maple Syrup – Adds natural sweetness and moisture. Substitution: Honey or agave syrup, depending on dietary needs.
For the Topping
• Chocolate Chips – Adds a rich, chocolaty topping. Note: Dairy-free chocolate chips can be used to maintain vegan status.
• Coconut Oil – Helps to melt the chocolate smoothly and add a slight gloss. Optional: Can be omitted if desired.
Now that you have all the necessary ingredients, you’re one step closer to making these indulgent yet nutritious Chocolate Peanut Butter No Bake Bars!
Step‑by‑Step Instructions for Chocolate Peanut Butter No Bake Bars
Step 1: Prepare the Pan
Start by lining an 8×8-inch square pan with parchment paper, allowing some overhang for easy removal later. This small step ensures that your Chocolate Peanut Butter No Bake Bars come out effortlessly. Make sure the parchment paper is smooth and flat against the pan to create a neat base for your dessert.
Step 2: Mix Base Ingredients
In a medium saucepan, combine 1 cup of natural peanut butter and 1/2 cup of maple syrup over low heat. Stir continuously for about 2 minutes, until the mixture is smooth and well-blended. Gradually add in 1 cup of gluten-free oat flour, mixing until it thickens and becomes a cohesive dough.
Step 3: Press Base into Pan
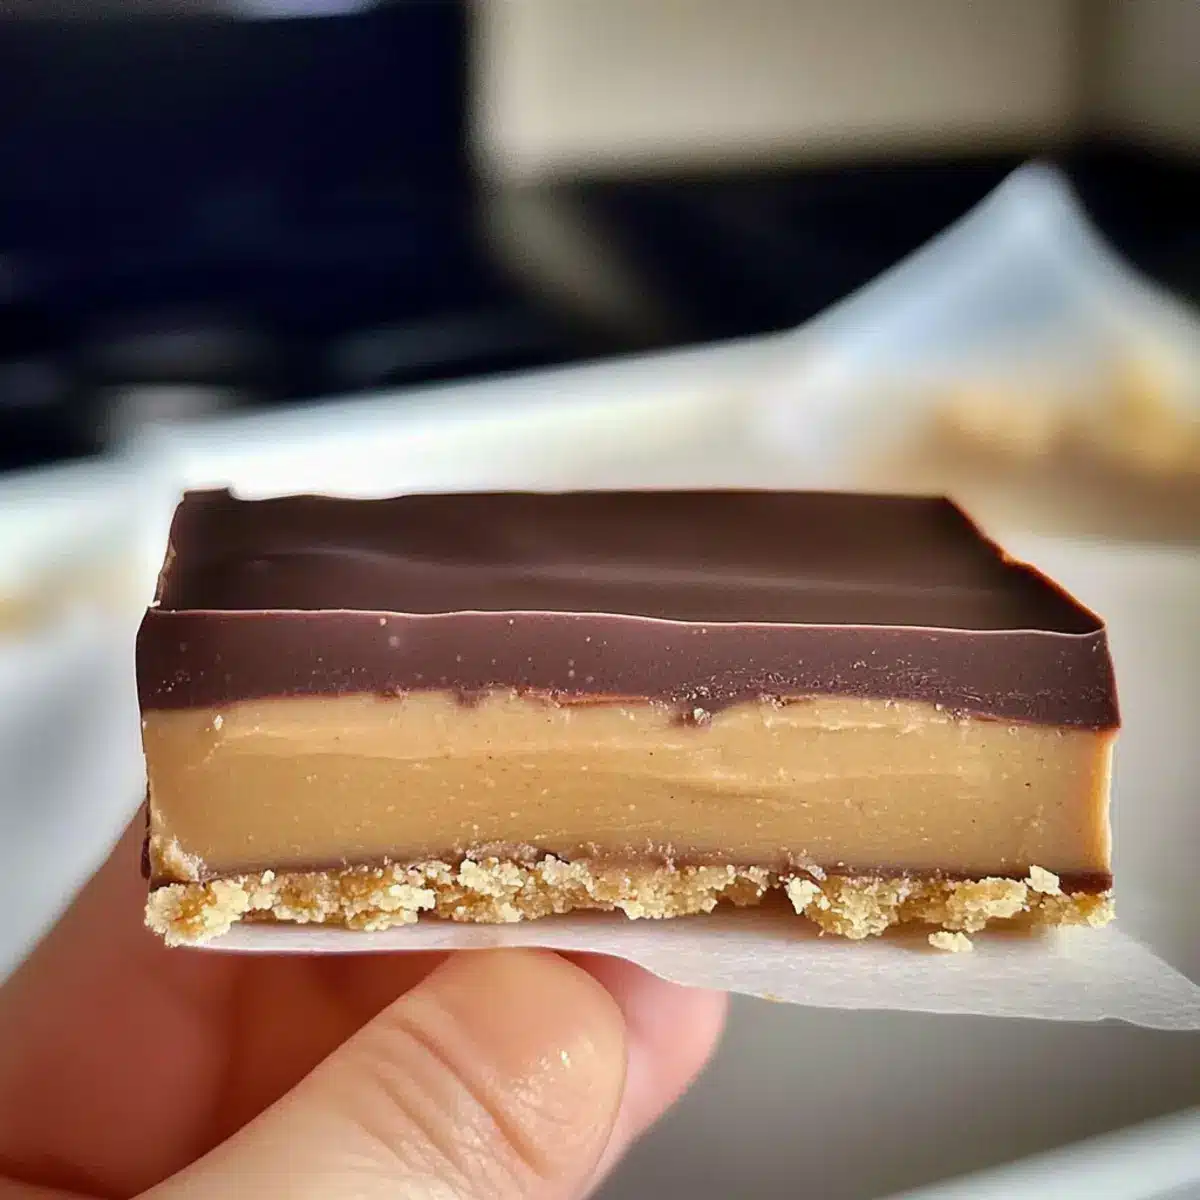
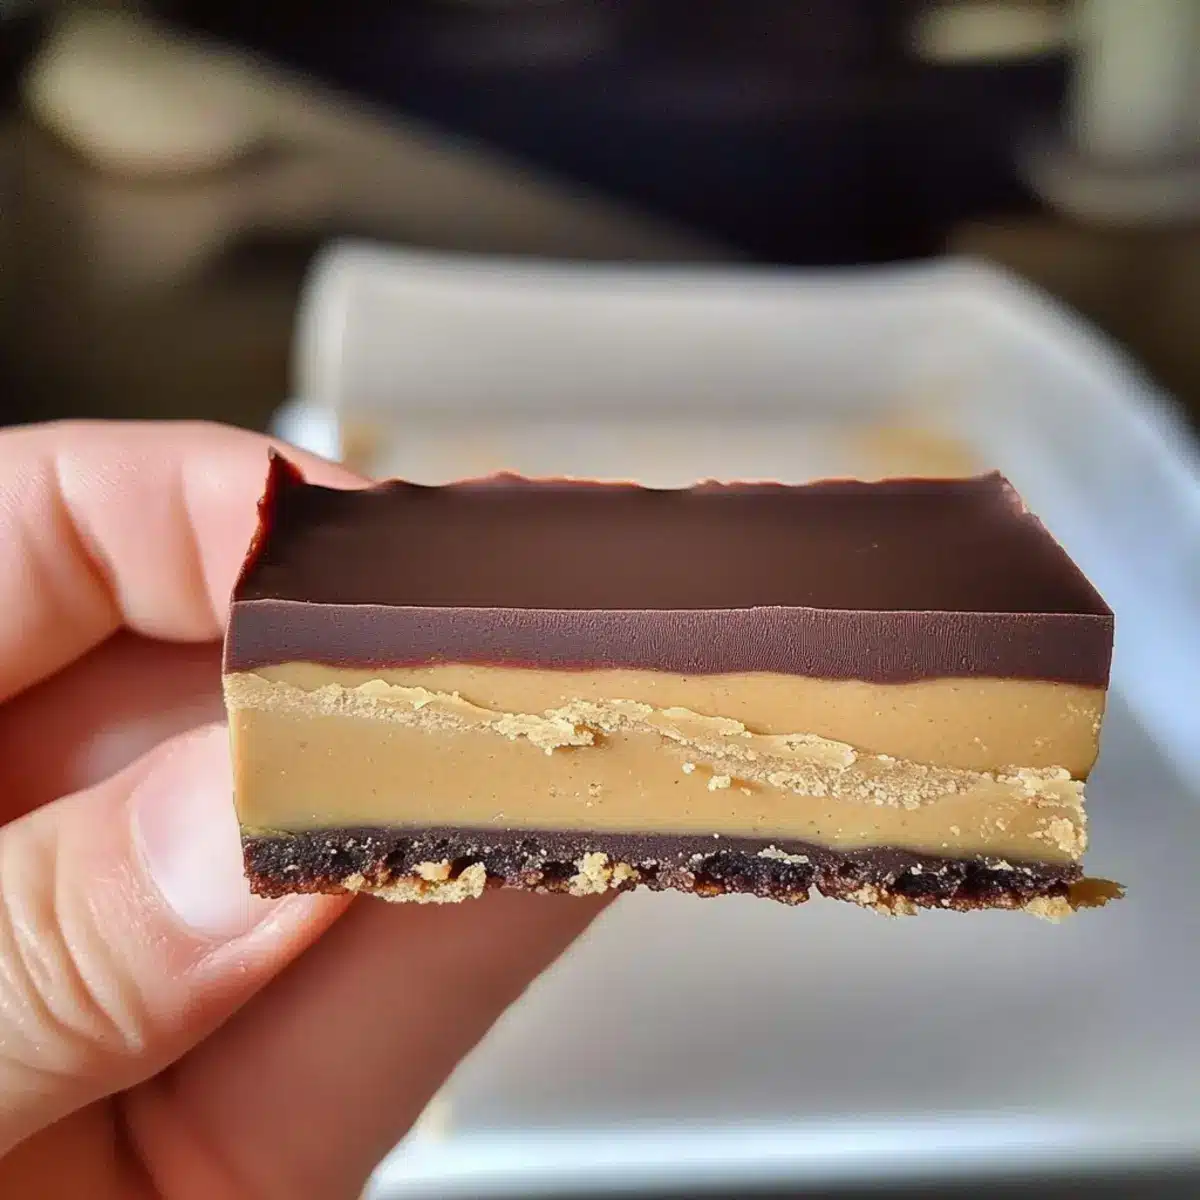
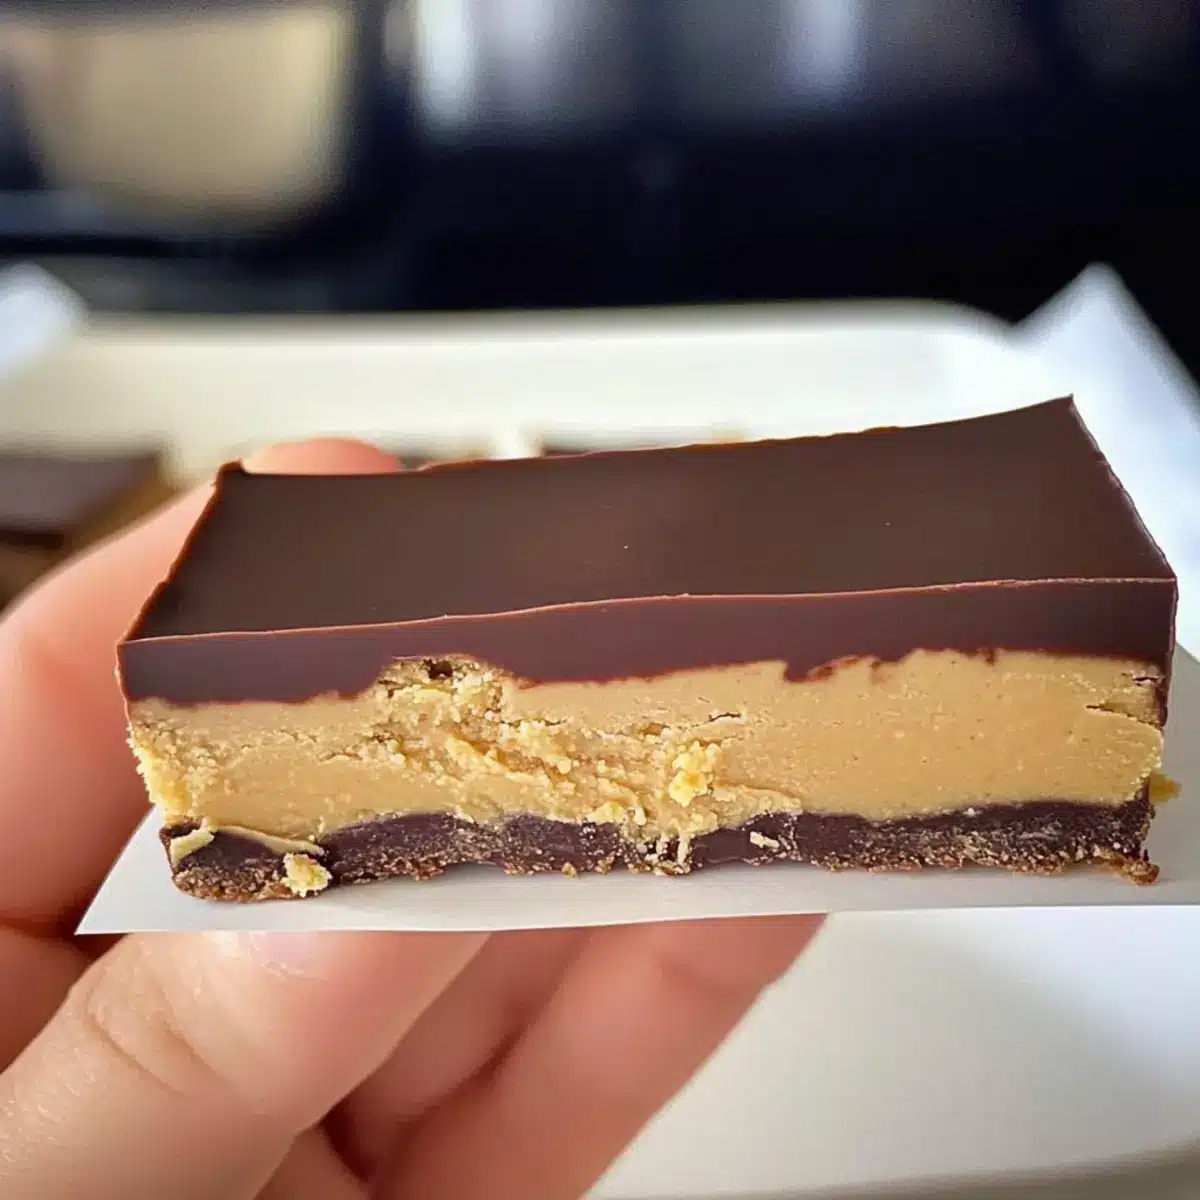
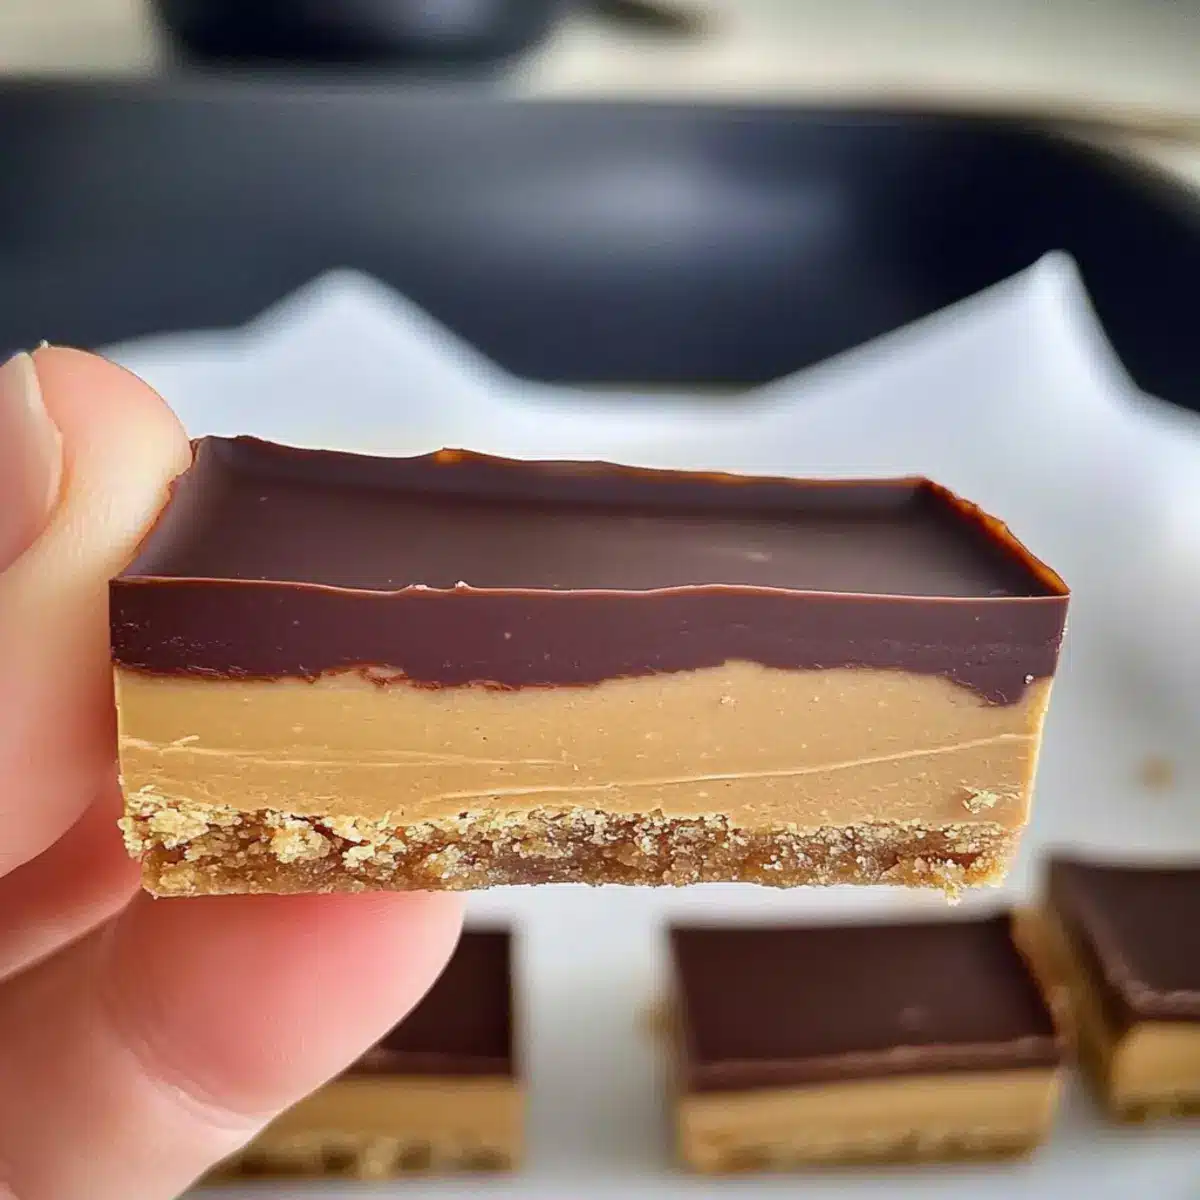
Carefully transfer the peanut butter mixture into the prepared pan. Using a spatula, press the mixture down firmly and evenly to form a solid base layer. Ensure it reaches all corners of the pan, creating a smooth and level surface which will hold the chocolate topping nicely once set.
Step 4: Melt Topping
Clean your saucepan, then place it back on low heat. Add 1 cup of chocolate chips and 1 tablespoon of coconut oil, stirring constantly until melted and smooth, which should take about 3–4 minutes. The glossy consistency will provide the perfect topping for your bars, enhancing the rich chocolate flavor.
Step 5: Combine Layers
Pour the melted chocolate mixture evenly over the pressed base layer in the pan. Gently rock the pan back and forth to level the chocolate topping, ensuring an even spread. This will give your Chocolate Peanut Butter No Bake Bars a beautiful, glossy finish that invites you to dig in once they are set.
Step 6: Chill
Place the pan in the refrigerator and chill for 2 to 3 hours, or until the bars are firm to the touch. If you prefer a deeper flavor, leaving them overnight is even better. Chilling allows the flavors to meld together while solidifying the layers for a perfect bite.
Step 7: Slice and Serve
After chilling, let the pan rest at room temperature for about 5–10 minutes before slicing. This warming will make cutting through the chocolate topping easier and help prevent cracking. Once cut into squares, indulge in your delicious Chocolate Peanut Butter No Bake Bars, perfect for any occasion!
What to Serve with Chocolate Peanut Butter No Bake Bars
These delectable bars can be the start of a delightful dessert spread or a charming picnic treat!
-
Fresh Berries: The tartness of strawberries or raspberries creates a refreshing contrast, balancing the rich chocolate and nutty flavors. Consider a vibrant berry medley that adds both color and a juicy burst to every bite.
-
Coconut Whipped Cream: Light and airy, this dairy-free topping enhances the creamy texture of the bars while adding a tropical flair. It’s the perfect indulgent touch for those warm summer evenings.
-
Almonds or Pecans: A handful of toasted nuts brings in a delightful crunch, complementing the soft bars beautifully. Not only do they add texture, but they also offer a nutritious boost to your treat!
-
Matcha Green Tea: The earthy notes of this antioxidant-rich drink contrast perfectly with the sweetness of the bars. Sip on a warm cup to enhance the decadent experience of your chocolaty dessert.
-
Chilled Almond Milk: Smooth and soothing, this dairy-free option serves as a great refreshing pairing that keeps things light. It quenches your thirst after enjoying your delightful chocolate indulgence!
-
Banana Slices: Sweet, creamy, and comforting, banana slices provide a satisfying addition, making every bite feel even more wholesome. They’re a simple way to add a fruity note and enhance the overall appeal of your dessert.
-
Dark Chocolate Drizzle: For those craving an extra chocolaty punch, drizzling some melted dark chocolate over the bars will elevate them to a whole new level of indulgence. It’s an easy way to make your treat even more beautifully delicious!
Expert Tips for Chocolate Peanut Butter No Bake Bars
-
Room Temperature Slicing: Let the bars sit out for 5-10 minutes before slicing to achieve clean, even cuts without cracking the chocolate.
-
Oat Flour Substitute: If using almond flour, make sure the mixture remains thick enough to hold its shape, or your bars may crumble when cut.
-
Texture Variations: To add a delightful crunch, mix in chopped nuts or puffed grains with the base mixture for extra texture in your Chocolate Peanut Butter No Bake Bars.
-
Storage Steps: Keep your bars fresh by storing them in an airtight container in the refrigerator for up to two weeks, or freeze for longer-lasting treats.
-
Experiment with Flavors: Feel free to add ingredients like vanilla extract or sea salt to enhance flavor and customize your treats even further.
How to Store and Freeze Chocolate Peanut Butter No Bake Bars
Fridge: Store your Chocolate Peanut Butter No Bake Bars in an airtight container for up to two weeks. They stay fresh and delicious, ready for whenever you crave a sweet treat!
Freezer: For longer storage, wrap individual bars in plastic wrap and place them in a freezer-safe bag. They can be frozen for up to three months, perfect for batch cooking!
Thawing: Simply take out a bar from the freezer and let it sit at room temperature for about 10 minutes before enjoying. This way, you’ll get that perfect creamy texture back.
Serving Tips: If the bars are too hard to cut straight from the fridge or freezer, allow them to thaw slightly to make slicing easier, ensuring a clean, delightful presentation.
Make Ahead Options
These Chocolate Peanut Butter No Bake Bars are a fantastic choice for meal prep, allowing you to enjoy a healthy treat without the last-minute rush. You can prepare the base up to 24 hours in advance; simply mix the peanut butter, maple syrup, and oat flour, then press it into the pan. Store it covered in the refrigerator, which helps maintain its firmness and flavor. The chocolate topping can also be melted and poured over the base the day before you plan to serve them. Just make sure to chill the bars for at least 2-3 hours, or overnight, until they are set. When you’re ready to indulge, allow them to sit at room temperature for about 5-10 minutes before slicing for the perfect clean cut. Enjoy the time-saving benefits while still treating yourself to these delicious Chocolate Peanut Butter No Bake Bars!
Chocolate Peanut Butter No Bake Bars Variations
Feel free to elevate your Chocolate Peanut Butter No Bake Bars with these delightful twists that cater to diverse tastes and dietary preferences.
- Dairy-Free: Use dairy-free chocolate chips to maintain the vegan aspect without sacrificing the chocolatey flavor.
- Nut-Free: Substitute peanut butter with sunflower seed butter to create a nut-free version perfect for schools or gatherings.
- Grain-Free: Swap gluten-free oat flour for almond flour and enjoy a richer, nuttier taste while staying grain-free.
- Flavor Boost: Add 1 teaspoon of vanilla extract to the base for a warm, aromatic flavor that brings the bars to life.
- Salted Caramel Twist: Drizzle a homemade or store-bought vegan caramel sauce over the chocolate topping for a luxurious finish.
- Coconut Crunch: Mix in toasted shredded coconut into the base for added texture and a tropical twist.
- Maple Variance: Substitute maple syrup with date syrup for a slightly different flavor that complements the rich chocolate and nutty peanut butter.
- Spicy Kick: For those who like a little heat, a pinch of cayenne pepper in the chocolate topping can tantalize your taste buds and play beautifully against the sweetness.
These variations can easily transform a simple recipe into an exciting new treat. If you’re curious for more delicious combinations, you might enjoy making White Chocolate Cranberry Cookies or try these delightful Christmas Bars Chewy on your next dessert adventure!
Chocolate Peanut Butter No Bake Bars Recipe FAQs
How do I choose ripe ingredients for Chocolate Peanut Butter No Bake Bars?
Absolutely! When selecting natural peanut butter, go for the variety that contains minimal ingredients—just peanuts and maybe a tiny bit of salt. Check for a smooth consistency without added sugars or hydrogenated oils; the fresher, the better! For maple syrup, a darker grade indicates a bolder flavor, which can enhance the bars.
How should I store Chocolate Peanut Butter No Bake Bars, and how long do they last?
These bars can be stored in an airtight container in the refrigerator for up to two weeks, making them a convenient, guilt-free snack. If you want to keep them for longer, wrapping them in plastic wrap and placing them in a freezer-safe bag will ensure freshness for up to three months.
Can I freeze Chocolate Peanut Butter No Bake Bars?
Certainly! To freeze, wrap each bar individually in plastic wrap and then place them in a freezer-safe bag to prevent freezer burn. When you’re ready to enjoy one, take it out and let it thaw at room temperature for about 10 minutes. This simple method will maintain their delicious texture!
What should I do if the bars crumble when I cut them?
If your Chocolate Peanut Butter No Bake Bars crumble upon cutting, it might be because the base was too dry. Next time, ensure you mix the ingredients thoroughly until they form a cohesive dough. If you’re using almond flour, monitor the moisture levels closely; you may need to add a bit more maple syrup or peanut butter to achieve a proper consistency.
Are there any dietary considerations for Chocolate Peanut Butter No Bake Bars?
Very! These bars are vegan and gluten-free, appealing to a broad range of dietary preferences. However, if you’re preparing for someone with nut allergies, you can substitute the peanut butter with sunflower seed butter for a similar taste without allergens. Always ensure that your chocolate chips are dairy-free if you wish to maintain their vegan status.
What are some delicious variations I can create with this recipe?
Of course! To customize your Chocolate Peanut Butter No Bake Bars, try adding flavors like a teaspoon of vanilla extract or a sprinkle of sea salt for enhanced taste. You could swap the oat flour for almond flour if desired or even mix in some chopped nuts or dried fruits for added texture and flavor diversity. The more the merrier!
Chocolate Peanut Butter No Bake Bars for Guilt-Free Indulgence
Ingredients
Equipment
Method
- Prepare the pan by lining an 8x8-inch square pan with parchment paper.
- In a medium saucepan, combine 1 cup of natural peanut butter and 1/2 cup of maple syrup over low heat, stirring for about 2 minutes until smooth.
- Add 1 cup of gluten-free oat flour gradually and mix until thick and cohesive.
- Transfer the peanut butter mixture into the prepared pan, pressing it down firmly to form a solid base layer.
- Melt 1 cup of chocolate chips and 1 tablespoon of coconut oil on low heat, stirring until smooth (about 3–4 minutes).
- Pour the melted chocolate mixture evenly over the pressed base layer and level it by rocking the pan.
- Chill in the refrigerator for 2 to 3 hours until firm.
- Let rest at room temperature for 5–10 minutes before slicing into squares.
Leave a Reply