
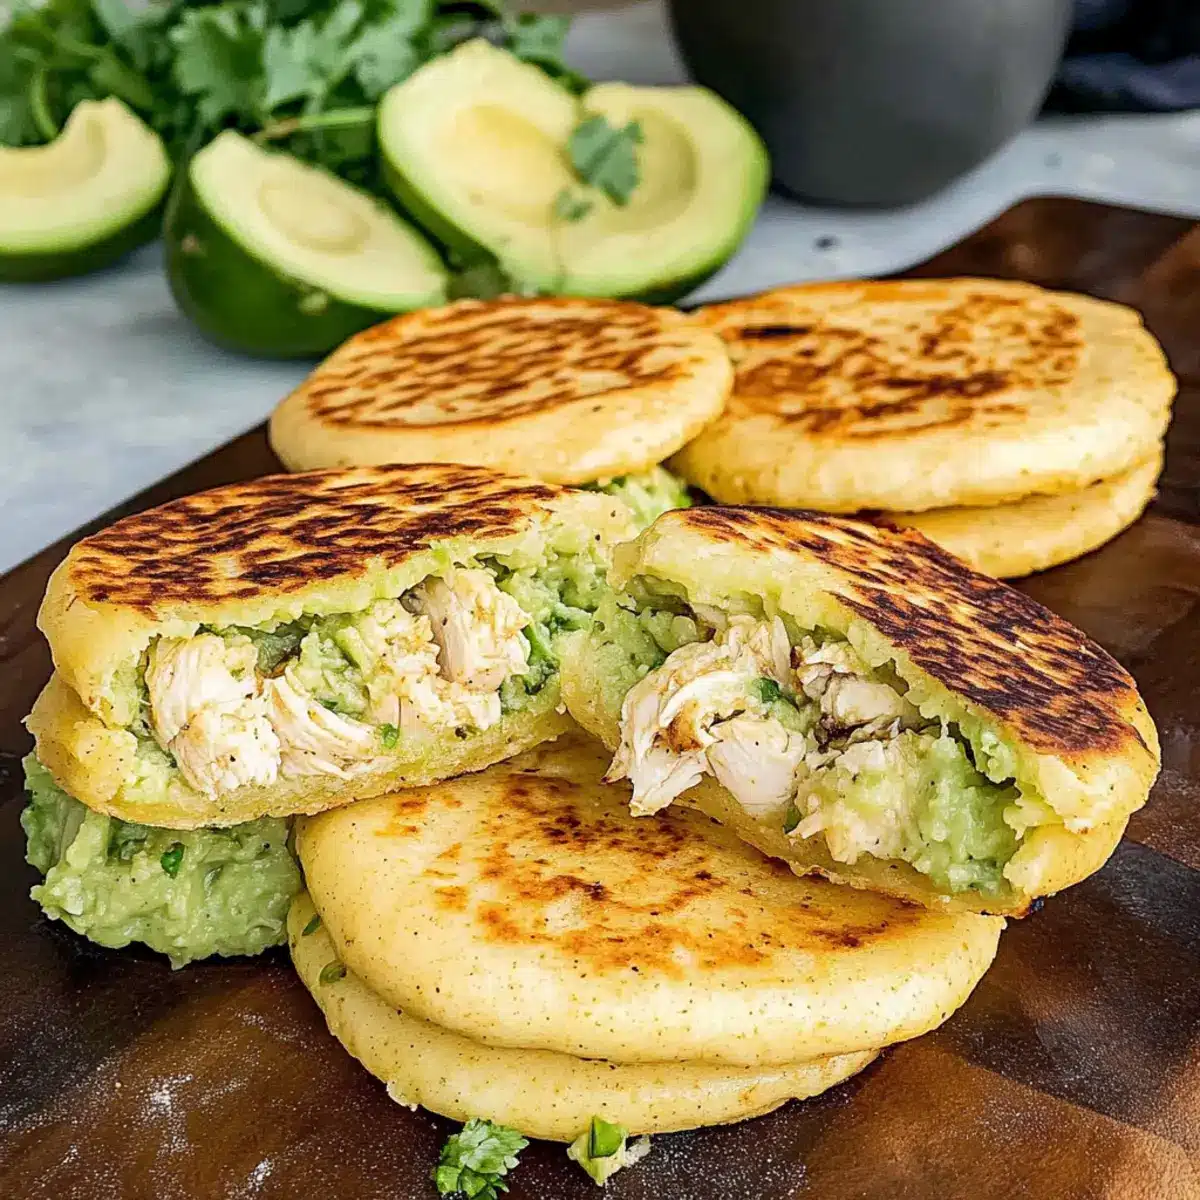
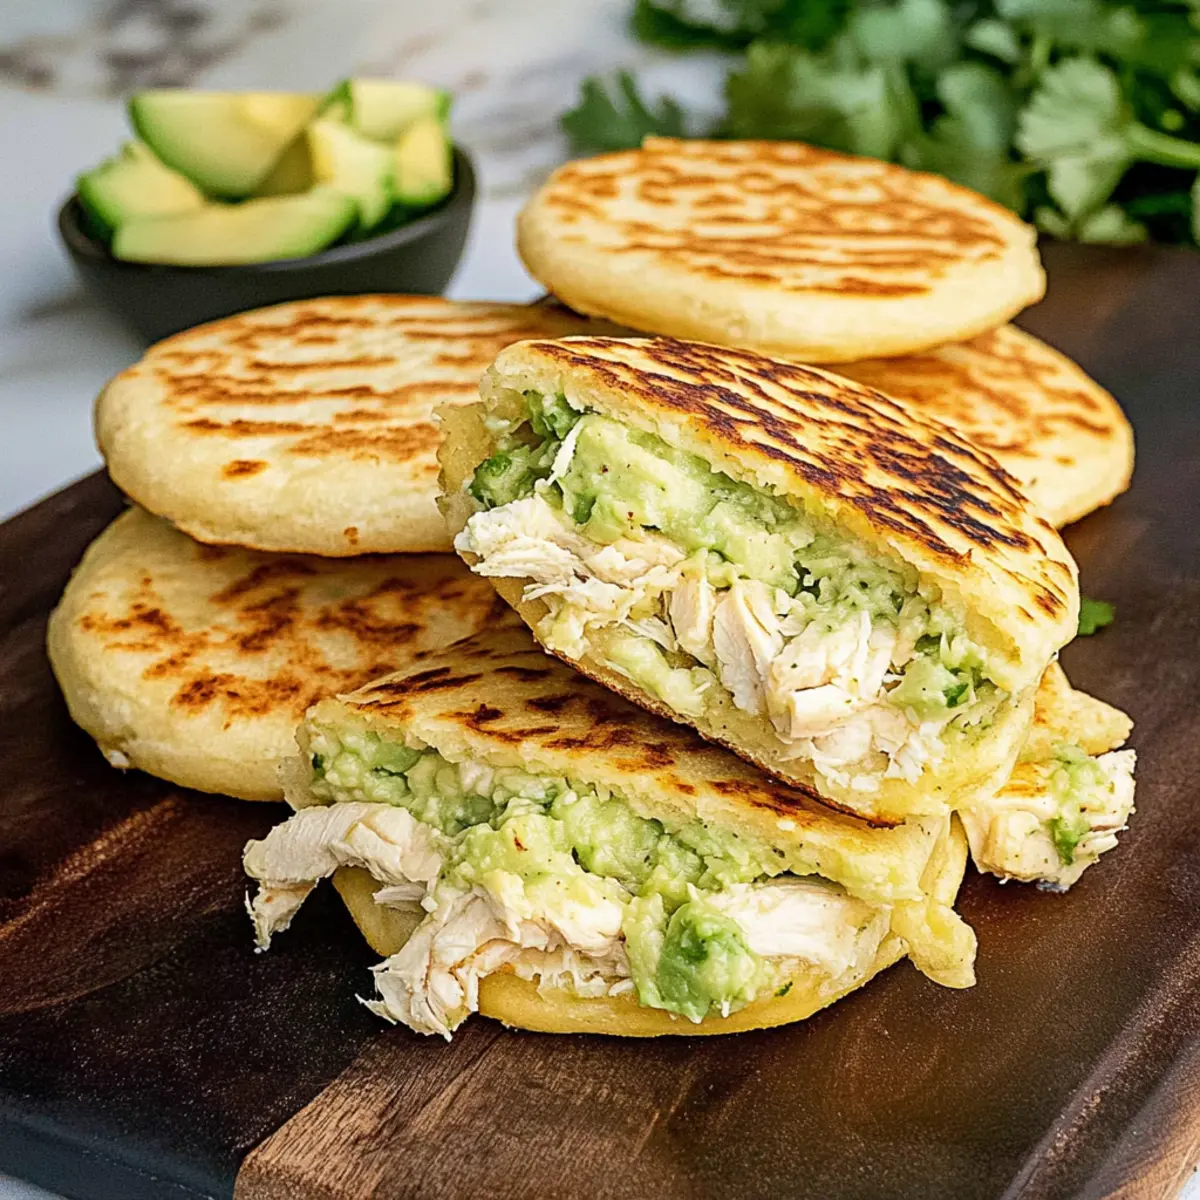
Walking through the bustling streets of Caracas, the aroma of warm cornmeal cakes beckons—it’s impossible not to be intrigued. Today, I’m thrilled to share my take on Homemade Arepas with Reina Pepiada, a dish steeped in Venezuelan tradition yet adaptable for any kitchen. These golden delights boast a crispy exterior and a tender, hearty interior, cradling a creamy filling of shredded chicken and fresh avocado that’s downright irresistible. What’s more? This recipe is not just gluten-free but versatile enough to suit any palate with myriad filling options! Whether you’re hosting guests or enjoying a quiet family dinner, these arepas are guaranteed to impress. Ready to bring a taste of South America into your home? Let’s dive in!
Why Are You Going to Love Arepas?
Deliciously Versatile: These Homemade Arepas can be filled with almost anything! From the creamy Reina Pepiada filling to cheeses and beans, there’s something for everyone.
Crispy and Comforting: Experience the ideal combination of crunchy outer layer with a warm, soft interior, creating a comforting bite you’ll crave again and again.
Quick to Make: In less than an hour, you can craft a meal that feels gourmet without all the fuss—perfect for a weeknight dining adventure!
Crowd-Pleasing Delight: Ideal for gatherings, serve them with colorful salsas or salads for an inviting spread that complements any occasion.
Gluten-Free Goodness: As these are made with cornmeal, they’re naturally gluten-free, allowing everyone to enjoy them without worry. For more gluten-free treats, check out my Pumpkin Scones Homemade for a sweet finish!
Get ready to indulge in a delightful culinary experience!
Homemade Arepas Ingredients
For the Arepas
- Pre-cooked white cornmeal – Provides structure and texture for the arepas; look for brands like P.A.N. for authenticity.
- Warm water – Hydrates the cornmeal for dough formation; use water at 100°F to 110°F for optimal mixing.
- Salt – Enhances flavor in arepas.
- Vegetable oil – Adds moisture and helps achieve a crispy exterior during cooking.
For the Reina Pepiada Filling
- Cooked chicken (shredded) – Main protein for the filling, offers a savory contrast to the creamy avocado; rotisserie chicken is a convenient option.
- Ripe avocado – Provides creaminess in the filling; can be adjusted to taste preference for richness.
- Mayonnaise – Adds creaminess and binding in the filling; substitute with Greek yogurt for a lighter option.
- Small onion (finely chopped) – Adds sweetness and texture to the filling.
- Cilantro (finely chopped) – Fresh herb that brightens the flavor profile; omit if desired.
- Jalapeño (optional) – Provides a little heat; remove the seeds for a milder flavor.
- Juice of lime – Balances flavors with acidity; adjust according to taste.
- Salt and pepper – To taste, enhances overall flavor.
Embrace the art of making Homemade Arepas, and let each bite transport you to the vibrant streets of South America!
Step‑by‑Step Instructions for Homemade Arepas
Step 1: Prepare the Dough
In a large mixing bowl, combine the pre-cooked white cornmeal, salt, and vegetable oil. Gradually add warm water, heated to about 100°F to 110°F, as you mix until the dough is smooth and pliable. Allow the mixture to rest for 5 minutes; this step is essential for optimal dough hydration.
Step 2: Shape the Arepas
After resting, divide the dough into six equal portions. Roll each portion into a ball and then gently flatten it into discs approximately 4-5 inches wide, ensuring an even thickness. The shape and size will give your Homemade Arepas a delightful texture that holds the creamy Reina Pepiada filling perfectly.
Step 3: Cook the Arepas
Heat a non-stick skillet over medium heat and brush the surface lightly with vegetable oil. Carefully place the flattened arepas onto the skillet, cooking them for 6-7 minutes on each side. Look for a golden brown color and a slightly crispy exterior before removing them from the heat; this creates the ideal texture for your Homemade Arepas.
Step 4: Crisp in the Oven
For an extra crispy finish, transfer the cooked arepas to a preheated oven at 350°F (175°C) for an additional 10-15 minutes. This step not only enhances the texture but also keeps them warm while you prepare the filling. Enjoy the comforting aroma that fills your kitchen during this time!
Step 5: Prepare the Filling
In a separate bowl, combine the shredded chicken, finely chopped onion, cilantro, and optional jalapeño for a bit of heat. This mixture will form the savory base of your Reina Pepiada filling, providing a delightful contrast to the crunch of the Homemade Arepas.
Step 6: Create the Creamy Mixture
In another bowl, mash the ripe avocado until smooth, then stir in the mayonnaise and lime juice. Blend this mixture into the chicken filling until evenly combined, ensuring that each bite of your Reina Pepiada filling is rich and creamy. Adjust seasoning with salt and pepper to taste.
Step 7: Fill the Arepas
Using a sharp knife, carefully slice a pocket into each warm arepa, taking care not to cut all the way through. Generously fill each pocket with the creamy Reina Pepiada mixture you prepared earlier. The warm arepas will perfectly embrace the flavors, making for an irresistible bite!
Step 8: Serve and Savor
Serve the filled Homemade Arepas warm, allowing your family and friends to dig in right away. These are perfect for any meal and can be accompanied by fresh salsas or salads. Enjoy the delightful combination of textures and flavors that this dish brings to your table!
Storage Tips for Homemade Arepas
-
Room Temperature: Homemade Arepas can be kept at room temperature for up to 2 days in an airtight container to maintain their texture.
-
Fridge: Store leftovers in the fridge for up to 5 days. Place the arepas in a sealed container to prevent them from drying out or absorbing odors.
-
Freezer: For longer storage, freeze arepas for up to 3 months. Wrap each arepa tightly in plastic wrap and then place them in a freezer bag for added protection.
-
Reheating: To reheat, warm arepas in a skillet over medium heat for several minutes on each side, or place them in a preheated oven at 350°F (175°C) for about 10-15 minutes until heated through. Enjoy the crispy texture of your Homemade Arepas!
Homemade Arepas Variations & Substitutions
Feel free to explore new flavors and textures with these fun variations for your arepas that will surely tickle your taste buds!
-
Cheesy Twist: Swap the Reina Pepiada filling for melted mozzarella or queso fresco for a gooey, savory alternative.
-
Black Bean Delight: Substitute shredded chicken with seasoned black beans for a hearty, plant-based filling that’s oh-so-satisfying. Pair it with fresh pico de gallo for a vibrant kick.
-
Zesty Spices: Add a pinch of cumin or smoked paprika to the arepa dough for an extra punch of flavor. This simple twist elevates the basic taste to something extraordinary.
-
Veggie Lovers: Fill your arepas with a mix of sautéed peppers, onions, and zucchini for a colorful and nutritious option. It will add a fresh crunch to your meal.
-
Creamy Vegan Swap: Replace mayonnaise in the Reina Pepiada filling with avocado mayo or cashew cream for a deliciously creamy, plant-based alternative. The flavor remains rich without the dairy!
-
Sweet & Savory: Try adding a bit of sweet corn to your dough for a subtle sweetness that complements your savory fill. This unique blend of flavors will have your guests asking for more.
-
Fiery Jalapeño: For those who like it hot, include diced jalapeños in your filling or dough for an extra kick. Adjust the seeds to control the heat level based on your preference.
In the mood for a sweet finish? Check out my delightful Pumpkin Scones Homemade for a wonderful dessert option to complete your meal!
Make Ahead Options
These Homemade Arepas with Reina Pepiada filling are ideal for meal prep enthusiasts! You can prepare the dough up to 24 hours in advance; simply store it in an airtight container in the refrigerator to maintain its freshness. Additionally, the creamy filling can be made ahead and refrigerated for up to 3 days; just keep the avocado mixture separate until you’re ready to serve to prevent browning. When you’re ready to enjoy your delicious arepas, cook them straight from the fridge for the freshest taste. Simply follow the cooking instructions, fill them with your prepared Reina Pepiada filling, and you’ll have a quick and satisfying meal on the table in no time!
Expert Tips for Homemade Arepas
-
Rest the Dough: Allow the dough to rest for at least 5 minutes. This helps hydrate the cornmeal, making it easier to shape your Homemade Arepas without cracking.
-
Medium Heat Cooking: Always cook on medium heat to prevent burning while achieving a crispy exterior. High heat can cook the outside too quickly, leaving the inside undercooked.
-
Adjust Lime Flavor: For an extra zing in your Reina Pepiada filling, feel free to adjust the lime juice to your preference; it can greatly enhance the overall flavor.
-
Make Ahead: You can prepare the arepa dough in advance; just refrigerate it in an airtight container. This will save time on busy weeknights and ensure delicious Homemade Arepas are only a few steps away.
-
Experiment with Fillings: Don’t hesitate to swap the Reina Pepiada filling with other options like cheese, beans, or vegetables for a customized meal everyone will love!
What to Serve with Homemade Arepas
These delightful cornmeal cakes create the perfect canvas for a scrumptious dining experience, packed with flavor and warmth.
- Fresh Tomato Salsa: The bright acidity of tomatoes and cilantro adds a refreshing twist, balancing the rich Reina Pepiada filling beautifully.
- Creamy Avocado Salad: Complement your arepas with a cool, creamy salad made from ripe avocados and zesty lime, enhancing the overall texture.
- Spicy Black Beans: Hearty and flavorful, spicy black beans offer a protein-packed side that pairs exquisitely and rounds out your meal.
- Grilled Corn on the Cob: Sweet, tender corn adds a sweet crunch, echoing the cornmeal in the arepas and making every bite delightful.
- Classic Colombian Aji: This tangy salsa made with vinegar, cilantro, and jalapeños is a must-try for a zesty kick that elevates your arepas.
- Chilled Coconut Drink: Balance the flavors with a refreshing, sweet coconut drink, perfect for unwinding with each savory bite.
- Plantain Chips: Crispy, salty plantain chips bring a satisfying crunch that contrasts wonderfully with the soft texture of the arepas.
Homemade Arepas with Creamy Reina Pepiada Filling Recipe FAQs
What type of cornmeal is best for Homemade Arepas?
Absolutely! For the best results, use pre-cooked white cornmeal; brands like P.A.N. are particularly recommended for an authentic flavor and texture that will yield the perfect arepas.
How should I store leftover Homemade Arepas?
Leftover arepas can be stored at room temperature for up to 2 days, but if you’ll need a bit longer, keep them in the refrigerator for up to 5 days. Just make sure they’re in an airtight container to keep their texture intact.
Can I freeze Homemade Arepas?
Yes, you can freeze Homemade Arepas! Wrap each arepa tightly in plastic wrap and place them in a freezer bag. They can be stored for up to 3 months. When you’re ready to enjoy them, just reheat in a skillet or a preheated oven at 350°F (175°C) for about 10-15 minutes until warmed through.
What if my arepa dough is too dry?
No worries! If your dough is too dry, gradually add warm water, a tablespoon at a time, until the dough reaches the right consistency—smooth and pliable. Conversely, if it’s too wet, sprinkle in a bit more cornmeal until you achieve the desired texture. Resting the dough for at least 5 minutes can also help as it hydrates more evenly.
Are arepas safe for people with gluten allergies?
Very! Homemade Arepas are naturally gluten-free since they are made from cornmeal. They make a wonderful choice for anyone avoiding gluten. However, always double-check ingredient labels, especially for other fillings or condiments used.
Can I make the filling ahead of time?
Absolutely! You can prepare the Reina Pepiada filling in advance and store it in the fridge for up to 3 days. Just mix the ingredients and keep them covered. When you’re ready to serve, simply fill the warm arepas right before enjoying for the best flavor and texture!
Homemade Arepas: Crispy Corn Cakes with Creamy Filling
Ingredients
Equipment
Method
- In a large mixing bowl, combine the pre-cooked white cornmeal, salt, and vegetable oil. Gradually add warm water, heated to about 100°F to 110°F, as you mix until the dough is smooth and pliable. Allow to rest for 5 minutes.
- Divide the dough into six equal portions. Roll each into a ball and flatten to discs approximately 4-5 inches wide.
- Heat a non-stick skillet over medium heat and brush with vegetable oil. Cook the arepas for 6-7 minutes on each side until golden brown and crispy.
- Transfer the cooked arepas to a preheated oven at 350°F for an additional 10-15 minutes for extra crispiness.
- In a separate bowl, combine shredded chicken, finely chopped onion, cilantro, and jalapeño for the filling.
- Mash the ripe avocado and mix with mayonnaise and lime juice. Blend into the chicken filling, adjusting salt and pepper to taste.
- Slice a pocket into each warm arepa and fill generously with the creamy Reina Pepiada mixture.
- Serve the filled arepas warm, paired with salsas or salads, for a delightful meal.
Leave a Reply