
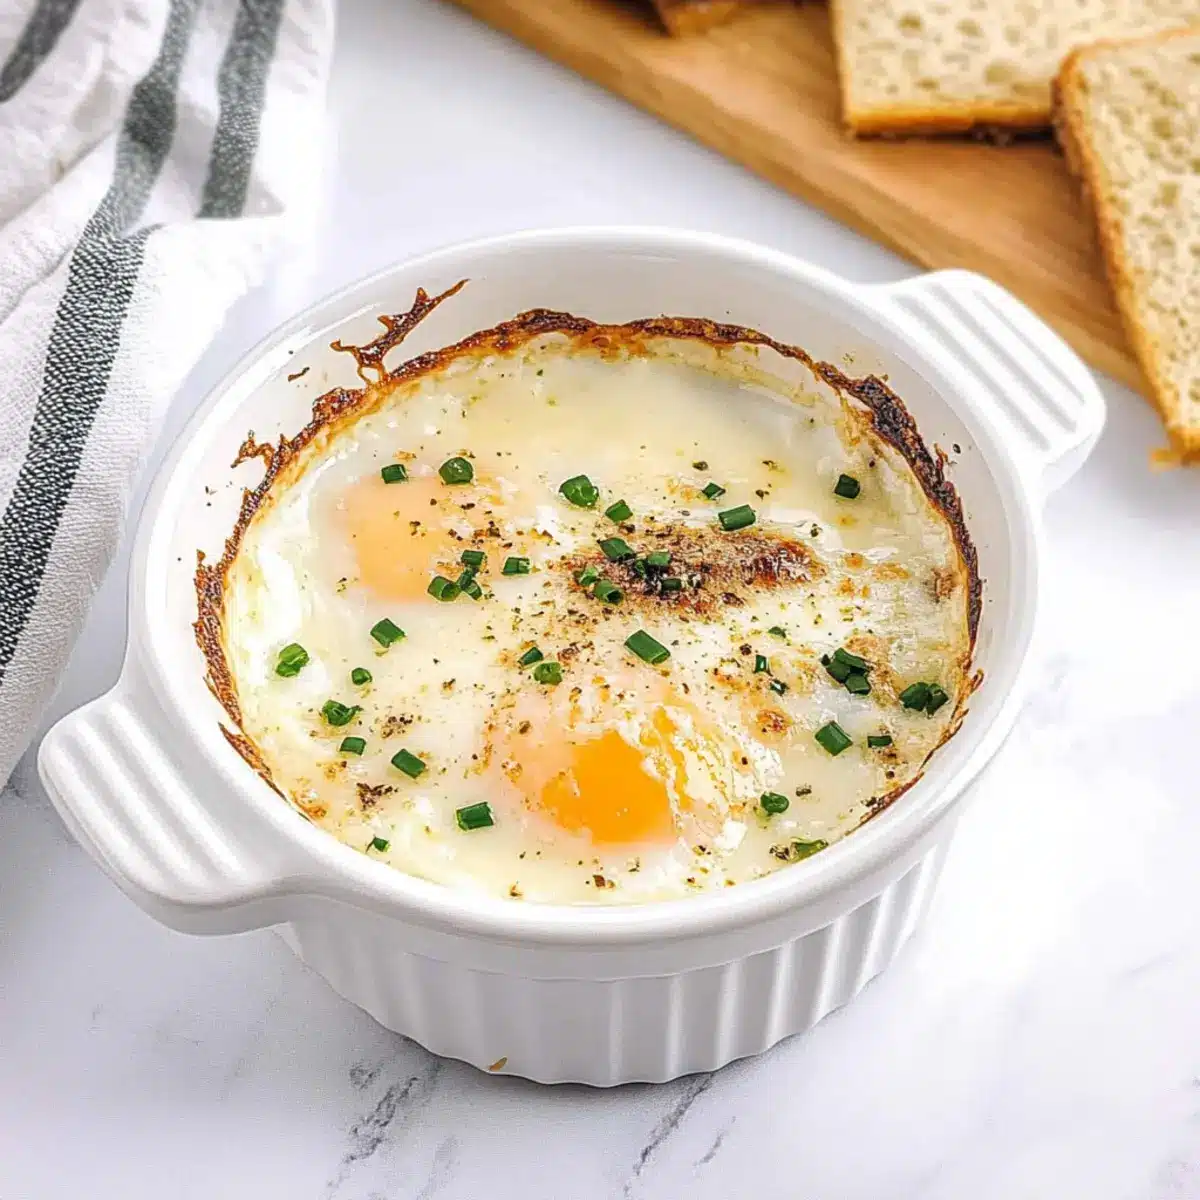
As I stood by the oven, the warm aroma of butter melting and eggs baking filled the air, instantly transforming my kitchen into a cozy brunch haven. When it comes to elevating your morning or weekend brunch, nothing quite compares to the elegance of Shirred Eggs. These perfectly baked creations bring together farm-fresh eggs, creamy Parmesan, and vibrant chives, all baked in charming ramekins for a foolproof meal that’s as satisfying as it is simple. In just 20 minutes, you’ll achieve a gorgeous result that impresses anyone at the table—ideal for those lazy Sunday mornings or unexpected guests. Plus, with the option for dairy-free adaptations, this recipe caters to a variety of dietary needs. Ready to indulge your taste buds and brighten your brunch routine? Let’s dive into this delightful dish!

Why Are Shirred Eggs So Irresistible?
Simplicity at its finest: With just a handful of ingredients, this dish comes together effortlessly, perfect for cooking novices and seasoned chefs alike.
Decadent creaminess: The heavy cream and melted Parmesan create a rich texture that elevates the humble egg to gourmet status.
Beautiful presentation: Each ramekin delivers an elegant individual serving that is as visually appealing as it is delicious.
Flexible ingredients: Customize with your favorite toppings, like sautéed veggies or different cheeses, to suit any palate or dietary need.
Quick and satisfying: In just 20 minutes, you can serve a sumptuous brunch that will wow family and friends. Perfect to pair with Air-Fryer Breakfast Potatoes or a refreshing Mimosa!
Shirred Eggs Ingredients
• Here’s everything you need for this delicious dish!
For the Base
- Unsalted Butter – Greasing the ramekin for a non-stick surface; substitute with vegan butter for dairy-free options.
- Heavy Cream – Adds richness and creaminess to the dish; substitute with high-fat oat milk or vegan cream for dairy-free versions.
- Large Eggs – The star of the recipe, providing structure, protein, and flavor; opt for local, farm-fresh eggs for best results.
For the Seasoning
- Salt – Enhances flavor; adjust to taste based on dietary needs.
- Freshly Ground Black Pepper – Adds mild heat and depth; freshly ground delivers the best flavor.
For the Garnish
- Minced Fresh Chives – For a fresh oniony taste and color contrast; substitute with green onions if needed.
- Grated Parmesan Cheese – Offers a savory touch and adds depth; use nutritional yeast as a dairy-free alternative in your Shirred Eggs.
Step‑by‑Step Instructions for Shirred Eggs
Step 1: Preheat the Oven
Begin by preheating your oven to 375°F (190°C). This ensures that the heat is evenly distributed and ready to create that perfect, creamy texture for your Shirred Eggs. While the oven warms up, you can prepare your ramekin, so everything flows seamlessly into the next steps.
Step 2: Prepare the Ramekin
Take a 6-ounce ramekin and generously grease it with unsalted butter, ensuring every edge is coated for easy removal later. This buttery layer is crucial for a non-stick finish allowing the Shirred Eggs to slide out effortlessly. Set the ramekin aside while you gather the remaining ingredients.
Step 3: Assemble the Ingredients
Pour a few tablespoons of heavy cream into the bottom of the prepared ramekin. The cream serves as a rich base, enhancing the luxurious texture of your Shirred Eggs. Next, gently crack the large eggs on top, being careful to keep the yolks intact for that delightful runny center we all love.
Step 4: Season and Garnish
Sprinkle a pinch of salt and freshly ground black pepper over the eggs, ensuring you season according to your taste preferences. Then, scatter the minced fresh chives and a generous topping of grated Parmesan cheese over everything. This final touch adds layers of flavor and visual appeal to your dish.
Step 5: Bake the Shirred Eggs
Carefully place the ramekin on a baking sheet to catch any possible spills, then slide it into the preheated oven. Bake for 12-15 minutes, watching closely for the egg whites to set while the yolks remain gloriously runny. The Parmesan should melt and bubble, creating a delicious garnishing layer.
Step 6: Rest and Serve
Once done, remove the ramekin from the oven and allow your Shirred Eggs to sit for 2 minutes. This slight cooling period helps firm up the edges while keeping the yolk delightfully runny. Serve immediately, paired with crispy toast or your favorite brunch sides for an elegant meal your guests will adore.
Make Ahead Options
Preparing these delightful Shirred Eggs ahead of time can simplify your busy mornings or brunch gatherings! You can mix the cream, salt, pepper, chives, and cheese in the ramekin up to 24 hours in advance, storing it covered in the refrigerator to preserve freshness. Just before serving, crack the eggs on top and bake as directed. This method maintains the delectable creamy texture, ensuring the dish is just as delicious when you finally pop it in the oven. Remember, for the best results, avoid pre-cooking the eggs to prevent overcooking. This time-saving approach not only eases your Sunday stress but allows you to have a gourmet brunch ready in minutes!
How to Store and Freeze Shirred Eggs
Fridge: Store any leftover Shirred Eggs in an airtight container for up to 2 days. However, keep in mind that reheating may impact the texture.
Reheating: If you have leftovers, reheat in the microwave on low power in short intervals, checking frequently to avoid overcooking, as they are best enjoyed fresh.
Freezer: Freezing is not recommended for Shirred Eggs, as the creamy texture and runny yolks do not hold up well once thawed and reheated.
Shirred Eggs Variations & Substitutions
Feel free to get creative and make this dish your own, as everyone loves a personal twist on classic flavors!
- Dairy-Free: Substitute unsalted butter with vegan butter and replace heavy cream with high-fat oat milk for a creamy finish.
- Veggie Boost: Add sautéed spinach or mushrooms to the base before placing the eggs for extra nutrients and flavor.
- Cheese Swap: Use goat cheese or feta instead of Parmesan for a tangy twist that offers a uniquely satisfying taste.
- Smoky Flavor: Incorporate a sprinkle of smoked paprika or some crispy bacon bits on top for an irresistible smoky element.
- Herb Infusion: Experiment with different fresh herbs like parsley or basil instead of chives for a refreshing herbal note.
- Heat It Up: A dash of hot sauce or sliced jalapeños will provide a delightful heat that contrasts beautifully with the creamy eggs.
- Flavorful Foundation: Try drizzling a bit of pesto over the cream before adding the eggs, infusing the dish with vibrant Italian flavors.
- Whole Grain Base: Serve it over a bed of quinoa or farro for added texture that will make each bite even more hearty and satisfying.
Let your creativity shine in the kitchen and embrace these delicious adaptations for your Shirred Eggs! For a fantastic side, think about pairing it with some crispy Air-Fryer Breakfast Potatoes or a refreshing Mimosa.
Expert Tips for Shirred Eggs
- Watch the Time: Keep a close eye on your Shirred Eggs to avoid overcooking; the goal is runny yolks and creamy whites for the perfect texture.
- Egg Quality Matters: Use local, farm-fresh eggs whenever possible, as they elevate the flavor and richness of the dish.
- Serving Temperature: Serve your Shirred Eggs immediately for the best experience; the delightful creamy texture diminishes if reheated.
- Personalize the Garnish: Feel free to get creative with toppings—add sautéed mushrooms or spinach to enhance flavor and nutrients while keeping it healthy.
- Ramekin Choice: Ensure your ramekin is oven-safe and the right size (6-ounce) to achieve the best baking results for your Shirred Eggs.
What to Serve with Perfectly Baked Shirred Eggs
Enhance your brunch experience with vibrant sides and delightful beverages that perfectly complement the creamy, rich flavors of shirred eggs.
-
Crispy Toast: The crunch of toasted bread adds a delightful contrast, perfect for soaking up runny yolks and creamy texture.
-
Air-Fryer Breakfast Potatoes: These golden, crispy bites bring warmth and heartiness to your meal, making each bite perfectly satisfying. A sprinkle of herbs can elevate their flavor!
-
Fresh Mixed Greens Salad: Light and refreshing, a simple salad with lemon vinaigrette balances the richness of the eggs, ensuring a well-rounded brunch spread.
-
Sautéed Spinach: The mild, earthy flavors of sautéed spinach provide a nutritious touch, effortlessly blending with the luxuriousness of the shirred eggs.
-
Savory Sausage Links: The hearty, meaty flavor of sausage adds a robust element to your brunch plate, making it feel indulgent and complete.
-
Refreshing Mimosa: A sparkling Mimosa provides a bright, citrusy contrast that cuts through the richness of the dish, adding a touch of festivity to your table.
-
Fresh Fruit Platter: Include a mix of berries and seasonal fruits to cleanse the palate and introduce refreshing sweetness alongside your savory shirred eggs.

Shirred Eggs Recipe FAQs
How should I select my eggs for Shirred Eggs?
Absolutely! When choosing eggs, look for local, farm-fresh options with clean, uncracked shells. The yolks should be vibrant and the whites should be clear. Fresh eggs make a significant difference in flavor and texture, enhancing your Shirred Eggs’ overall appeal.
What is the best way to store leftover Shirred Eggs?
Store any leftover Shirred Eggs in an airtight container in the refrigerator for up to 2 days. However, it’s important to note that the creamy texture may change upon reheating, so enjoy them fresh when possible for the best experience.
Can I freeze Shirred Eggs?
Freezing is not recommended for Shirred Eggs, as the creamy texture and runny yolk do not freeze well. The eggs can become overly rubbery and watery upon thawing, which compromises the delightful experience intended in this dish.
What can I do if I accidentally overcook my Shirred Eggs?
Very! If you notice your eggs have overcooked, don’t panic. Instead of trying to salvage them, acknowledge that next time, you’ll keep a closer watch as they bake. Aim for a baking time of 12-15 minutes, and allow them to rest for 2 minutes after taking them out for best results.
Are there any dietary considerations I should be aware of?
Certainly! If you have dietary restrictions, you can easily adapt this recipe. Use vegan butter and high-fat oat milk or cream for a dairy-free version. As always, check ingredient labels for allergens if you’re cooking for people with specific dietary needs. If you’re making a dish for pets, note that eggs can be a healthy treat, but any seasonings or additions should be avoided.
Can I customize my Shirred Eggs with additional ingredients?
Absolutely! Feel free to personalize your Shirred Eggs by adding your favorite ingredients, like sautéed vegetables—spinach and mushrooms work beautifully! You can also experiment with different cheeses, such as goat cheese or feta, to elevate the flavors, making it a perfect brunch centerpiece that suits all palates.

Easiest Shirred Eggs with Creamy Parmesan Bliss
Ingredients
Equipment
Method
- Preheat your oven to 375°F (190°C).
- Grease a 6-ounce ramekin with unsalted butter.
- Pour heavy cream into the bottom of the ramekin and crack the eggs on top.
- Season with salt and pepper, then add chives and Parmesan cheese.
- Place the ramekin on a baking sheet and bake for 12-15 minutes.
- Let the ramekin sit for 2 minutes before serving.
Leave a Reply