
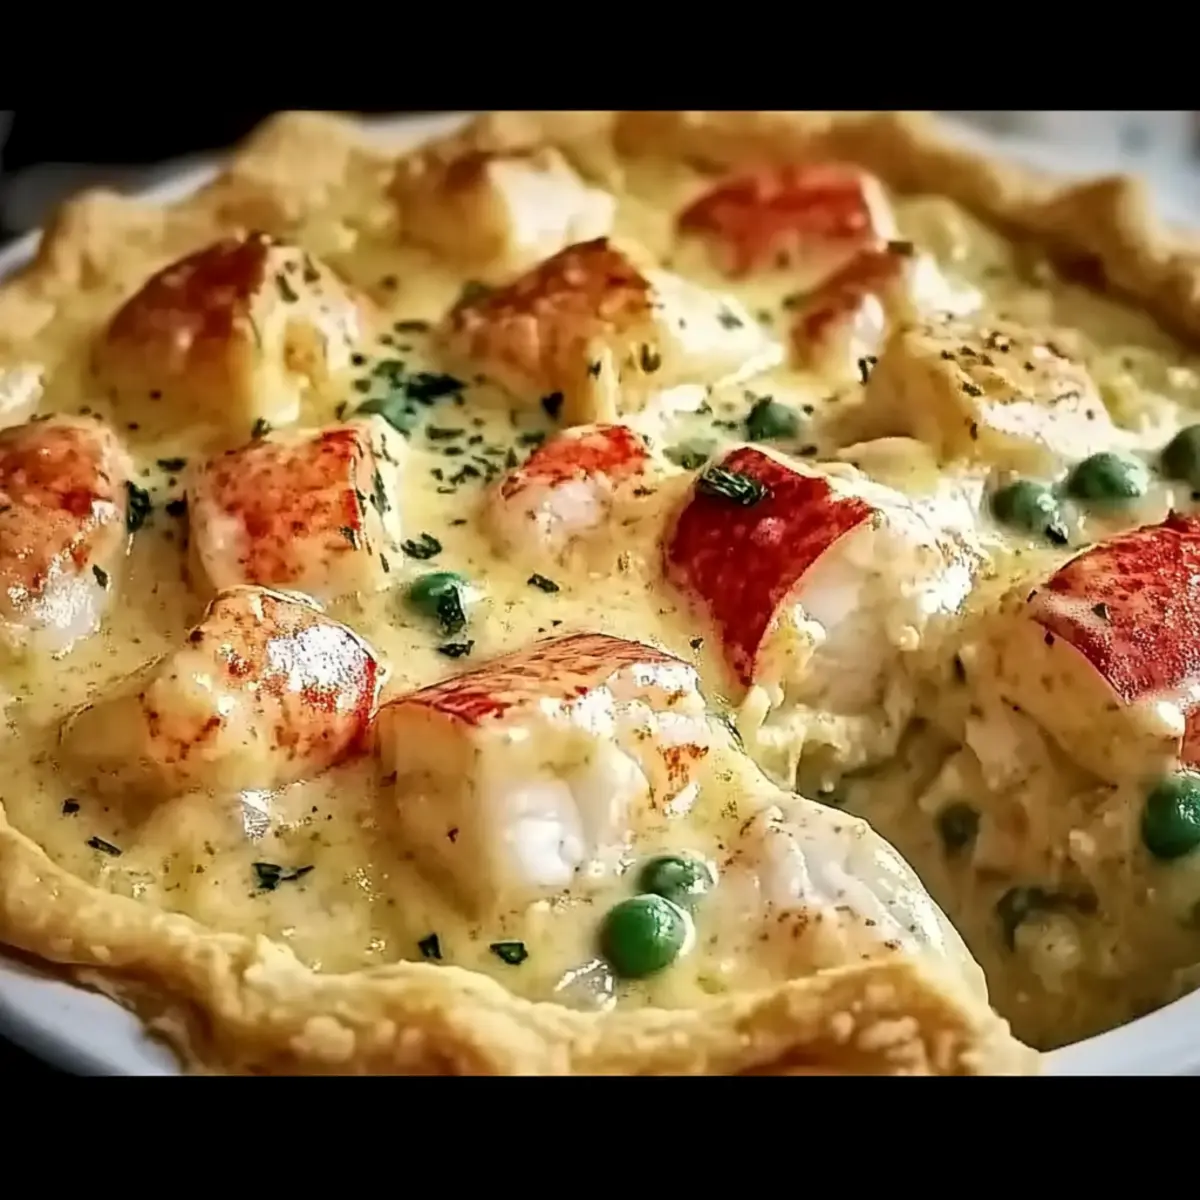
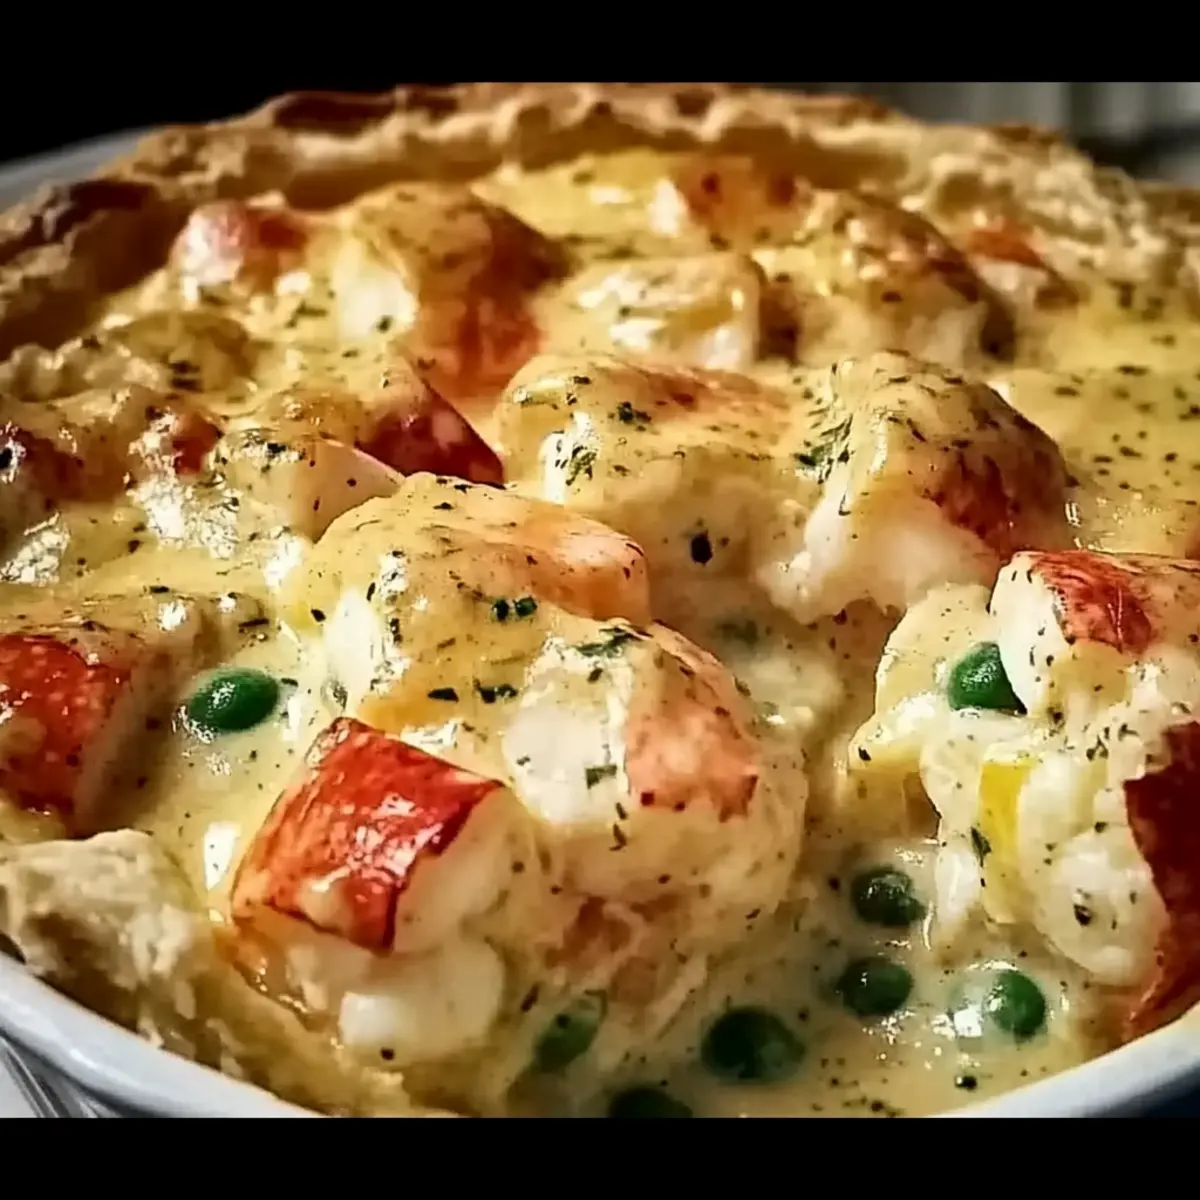
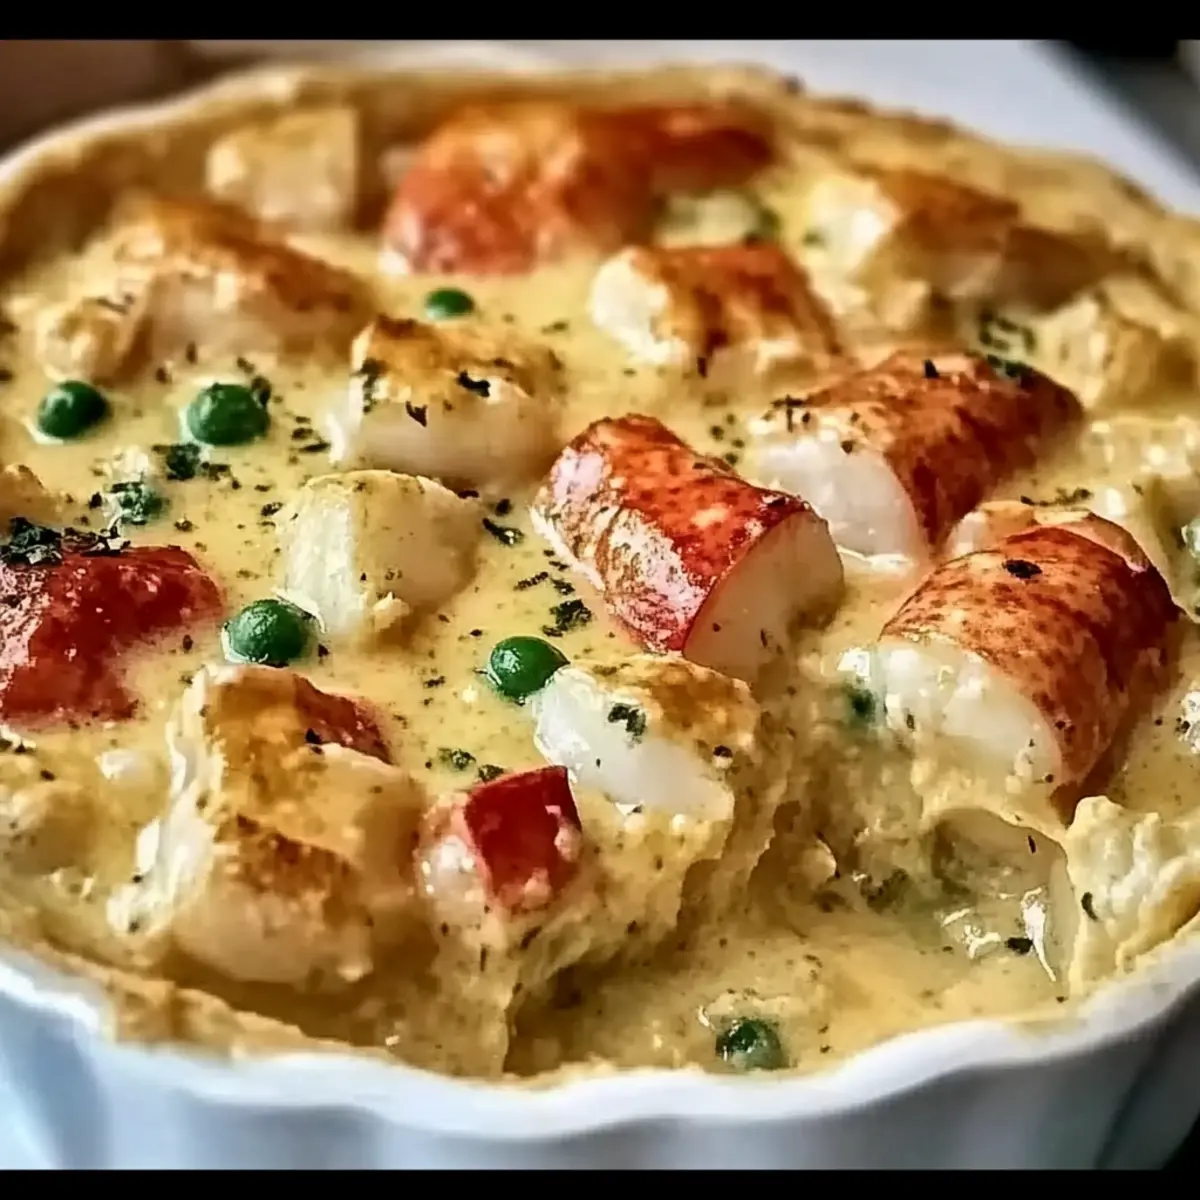
As I stood in my kitchen, the aroma of sautéing garlic and onions wrapped around me like a warm hug, I couldn’t help but smile. It was time to craft a comforting Ultimate Lobster Pot Pie, where luscious chunks of lobster meet a velvety cream sauce and vibrant veggies, all cradled in a flaky golden crust. This recipe not only elevates a classic comfort food but also comes together in a breeze, making it perfect for both cozy weeknights and special gatherings. Imagine serving this delicious seafood delight to family and friends, truly impressing even the toughest critics. Ready to dive into a world of flavor and nostalgia? Let’s get started!
Why is Lobster Pot Pie a Must-Try?
Comforting Indulgence: This Lobster Pot Pie envelops you in a warm embrace of flavors, combining succulent lobster with a creamy, rich filling that feels like a culinary hug.
Easy to Prepare: With just a few simple steps, you’ll have a gourmet dish ready without spending all day in the kitchen. It’s the perfect antidote for anyone tired of fast food!
Crowd-Pleasing Flavor: Impress your family and friends alike—who can resist the allure of buttery lobster baked in a flaky crust? Serve it with a light salad or crusty bread for a delightful meal.
Versatile Options: Feel free to customize by swapping lobster for crab or shrimp, and add your favorite veggies like mushrooms or asparagus for an extra touch.
Classic with a Twist: This take on a traditional pot pie offers a fresh seafood twist that elevates every bite, reminiscent of a coastal feast right at home. You’ll find yourself craving this delicious dish again and again!
Lobster Pot Pie Ingredients
For the Filling
• Fresh Lobster Meat – Provides the main protein and seafood flavor; use cooked lobster for convenience.
• Heavy Cream – Adds richness and creaminess to the filling; substitute with half-and-half for a lighter version.
• Chicken or Seafood Stock – Offers depth of flavor; homemade stock enhances taste, while store-bought works well for convenience.
• Olive Oil – Used for sautéing aromatics, adds richness; any neutral oil can be substituted.
• Onion (medium, diced) – Adds sweetness and flavor to the filling; leeks can work well as an alternative.
• Garlic (cloves, minced) – Enhances aroma and overall flavor; fresh garlic is preferred, though garlic powder can suffice.
• Carrots (diced) – Along with celery, creates a vegetable base for the filling; zucchini can also be used.
• Celery (diced) – Contributes to texture and aromatic depth; other crunchy vegetables can replace it.
• Frozen Peas – Provides color and sweetness; fresh peas can be substituted if available.
• Fresh Thyme (chopped) – Imparts a fresh herbal note; dried thyme is a great substitute.
• Lemon Juice – Adds brightness and balances richness, with white vinegar as an alternative.
• Salt – Enhances all flavors; adjust according to your taste.
• Black Pepper – Provides spice and depth; white pepper can be used for a milder flavor.
For the Crust
• Pre-Made Pie Crusts (2) – Offers convenience and saves time, but homemade crusts can add a personal touch.
• Beaten Egg (for egg wash) – Creates a golden, shiny finish; milk can be a suitable alternative for a less shiny surface.
Step‑by‑Step Instructions for Lobster Pot Pie
Step 1: Preheat Your Oven
Begin by preheating your oven to 400°F (200°C). This ensures that your Lobster Pot Pie will bake evenly and achieve that perfect golden brown crust. While your oven warms up, gather your ingredients and necessary equipment to streamline the cooking process.
Step 2: Sauté the Aromatics
In a large skillet, heat 2 tablespoons of olive oil over medium heat. Add 1 medium diced onion and 2 minced garlic cloves, sautéing them for about 3-4 minutes until the onion becomes translucent and fragrant. This step is crucial as it builds a flavorful base for your Lobster Pot Pie filling.
Step 3: Cook the Vegetables
Next, stir in 1 diced carrot and 1 diced celery stalk. Continue cooking for another 5 minutes, letting the vegetables soften. As they cook, the colors will brighten, and the sizzling sound will be a pleasant indicator that you are on the right track to a rich filling.
Step 4: Create the Filling
Pour in 1 cup of heavy cream and 1 cup of chicken or seafood stock, bringing the mixture to a gentle simmer. This will take about 2-3 minutes, and as it gently bubbles, you’ll notice the filling becoming creamy and rich, perfect for enveloping your lobster.
Step 5: Incorporate Lobster and Peas
Now, fold in 1 cup of chopped cooked lobster meat and 1 cup of frozen peas. Allow the mixture to simmer for an additional 5 minutes, stirring occasionally. The lobster should be warmed through, and the peas will add vibrant color, bringing your Lobster Pot Pie filling to life.
Step 6: Season to Perfection
Remove the skillet from heat and mix in 1 tablespoon of fresh thyme, 1 tablespoon of lemon juice, along with salt and black pepper to taste. This final seasoning step enhances the flavors, providing a balance to the richness of your filling, making it irresistible.
Step 7: Prepare the Pie Crust
Roll out one of the pre-made pie crusts and fit it into a 9-inch pie dish. Ensure the crust extends slightly over the edges to contain your delicious filling. This step prepares a sturdy base to hold the creamy lobster filling that’s sure to be a crowd-pleaser.
Step 8: Fill and Top the Pie
Carefully spoon the lobster filling into the prepared crust, spreading it evenly. Then, cover the pie with the second pre-made crust, crimping the edges securely to seal your savory bounty within. Don’t forget to cut slits in the top crust for steam to escape, preventing any overflow.
Step 9: Apply the Egg Wash
Brush the top crust with a beaten egg to create a beautiful golden, shiny finish as it bakes. This touch not only enhances the appearance but also adds a lovely flavor to the Lobster Pot Pie, making it even more appealing for your loved ones.
Step 10: Bake to Perfection
Transfer the pie into the preheated oven and bake for 30-35 minutes. Keep an eye on it—your Lobster Pot Pie is ready when the crust is golden brown, and the filling bubbles slightly around the edges, emitting a delightful aroma throughout your kitchen.
Step 11: Cool Down
Once baked, remove your Lobster Pot Pie from the oven and let it cool for 10-15 minutes. This resting period allows the filling to set, making it easier to slice and serve. The anticipation will build as delicious scents fill the air, making dinner even more rewarding.

Variations & Substitutions for Lobster Pot Pie
Explore delightful twists and substitutions to personalize your Lobster Pot Pie experience!
-
Crab or Shrimp: Swap out lobster for lump crab meat or shrimp for a different seafood flavor.
-
Spicy Kick: Add a pinch of cayenne pepper or red pepper flakes for a touch of heat that beautifully contrasts the creaminess.
-
Veggie Delight: Incorporate diced asparagus or mushrooms for added texture and flavor. Roasting them first can boost their depth, enhancing your dish.
-
Dairy-Free Option: Use coconut cream instead of heavy cream and dairy-free pie crust for a lactose-free alternative that still packs a creamy punch.
-
Herbal Infusion: Fresh dill or parsley can add an aromatic touch instead of thyme; the herbal notes will brighten the dish.
-
Zesty Flavor: Swap lemon juice for lime juice for a refreshing citrus twist that will liven up the filling.
-
Cheesy Goodness: Stir in some shredded cheese, like Gruyère or mozzarella, for an extra layer of indulgence and creaminess in every bite.
-
Whole Wheat Crust: Try a whole wheat pie crust for a nutty, wholesome approach that adds a unique flavor while giving a healthy twist to this comfort staple.
These variations allow you to get creative in the kitchen! If you’re in the mood for another seafood delight, consider trying a delightful Chicken Pot Pie or the rich flavors of Pecan Pie Bread. Your culinary adventure awaits you!
What to Serve with Lobster Pot Pie
Pairing this delectable dish with complementary sides and drinks elevates your dining experience to new heights.
- Garlic Mashed Potatoes: Creamy, buttery mash adds a comforting touch that pairs beautifully with the rich flavors of lobster.
- Fresh Garden Salad: Crisp greens with a light vinaigrette brighten the palate, balancing the richness of the pot pie.
- Steamed Asparagus: Tender asparagus spears offer a slight crunch and fresh flavor, adding vibrancy alongside the savory filling.
- Crusty Bread: Warm, crusty bread is perfect for soaking up the delicious creamy filling, making every bite more satisfying.
- Roasted Brussels Sprouts: The caramelization of Brussels sprouts’ earthy flavor complements the seafood, creating a well-rounded dish.
- Chardonnay: A glass of chilled Chardonnay enhances the lobster’s sweetness and pairs nicely with the pie’s creaminess, making for a perfect sip.
- Lemon Sorbet: For dessert, a light lemon sorbet cleanses the palate after the rich pie, providing a refreshing finish to the meal.
Make Ahead Options
Preparing Lobster Pot Pie ahead of time is a fantastic way to save time on busy weeknights! You can prepare the filling (minus the lobster) up to 24 hours in advance; simply sauté the vegetables, add the cream and stock, and let it cool before storing in an airtight container in the refrigerator. For the best flavor, keep the cooked lobster separate and mix it in just before filling the pie crust. When ready to bake, assemble the pie with your prepped filling, top crust, and egg wash, then bake as directed. This method keeps your Lobster Pot Pie just as delicious and allows you to enjoy a comforting meal with minimal effort!
How to Store and Freeze Lobster Pot Pie
Fridge: Store leftover Lobster Pot Pie in an airtight container for up to 3 days. Reheat slices in the oven at 350°F (175°C) for about 15-20 minutes to maintain the crust’s flakiness.
Freezer: For longer storage, freeze the unbaked Lobster Pot Pie. Wrap it tightly in plastic wrap and foil, keeping it for up to 2 months. Bake from frozen, adding 10-15 minutes to the baking time.
Reheating: If reheating previously baked Lobster Pot Pie, cover it with aluminum foil to prevent burning, reheating at 350°F (175°C) for about 25-30 minutes until heated through.
Thawing: For best results, thaw frozen Lobster Pot Pie in the fridge overnight before baking or reheating. This ensures an even temperature throughout the pie.
Expert Tips for Lobster Pot Pie
• Warm Stock Reminder: Ensure your chicken or seafood stock is warm before adding it to the mixture; cold stock can cool the filling and affect the cooking process.
• Prevent Runny Filling: Allow the Lobster Pot Pie to rest for 10-15 minutes after baking to help it set properly, preventing a watery mess when you slice it.
• Thawing Lobster: If using frozen lobster, make sure it’s completely thawed and well-drained to avoid excess moisture in your filling.
• Crust Choice: While pre-made pie crusts offer convenience, consider making homemade crusts for a personalized touch that elevates your lobster pot pie experience.
• Customizable Add-Ins: Feel free to substitute ingredients based on preference—swap lobster for crab or shrimp, and include your favorite vegetables for added flavor and texture.
• Egg Wash Tips: Brush the top crust generously with beaten egg for a beautiful golden finish; for a less shiny crust, milk can also work well.
Lobster Pot Pie Recipe FAQs
What type of lobster meat should I use for Lobster Pot Pie?
Absolutely! For the best flavor and texture, I recommend using freshly cooked lobster meat. If you’re short on time, pre-cooked lobster from the grocery store is a convenient choice. It’s essential to use meat that is tender and flavorful for a standout pot pie experience.
How do I store leftover Lobster Pot Pie?
Very! To keep your delicious Lobster Pot Pie fresh, store any leftovers in an airtight container in the refrigerator for up to 3 days. When ready to enjoy, I suggest reheating individual slices in the oven at 350°F (175°C) for about 15-20 minutes to maintain that coveted flaky crust.
Can I freeze Lobster Pot Pie?
Of course! If you want to save your pot pie for later, freeze it unbaked. Wrap it tightly in plastic wrap and aluminum foil to prevent freezer burn. You can keep it in the freezer for up to 2 months. When ready to bake, place the frozen pie directly in the oven, adding an additional 10-15 minutes to the baking time to ensure it’s thoroughly cooked.
What should I do if my Lobster Pot Pie filling is too runny?
If your filling turns out a bit runny, don’t worry! A common reason is not allowing the pie to rest after baking. Letting it sit for 10-15 minutes helps the filling to set and firm up, making it easier to slice without making a mess. Ensure your stock is warm when added, and consider increasing the cream to corn starch ratio as a preventative measure next time.
Can my pets have Lobster Pot Pie?
It’s best to keep Lobster Pot Pie away from your furry friends. While lobster is generally safe for dogs in small amounts, the heavy cream, seasoning, and pie crust can be rich and potentially harmful. If you want to share a bite, offer them a small piece of plain lobster meat without any cream or seasoning.
What if I have allergies to seafood?
Very important! If you or a guest has seafood allergies, it’s best to avoid Lobster Pot Pie altogether. Instead, you can create a similar pot pie using chicken, vegetables, or mushrooms, using the same creamy filling method to deliver a delicious alternative. Always double-check ingredients if cooking for someone with allergies to ensure everyone can enjoy the meal safely.
Lobster Pot Pie: Your Ultimate Comfort Food Revival
Ingredients
Equipment
Method
- Preheat your oven to 400°F (200°C) to ensure even baking.
- Heat olive oil in a skillet. Sauté the onion and garlic for 3-4 minutes until translucent.
- Add diced carrot and celery; cook for 5 minutes until softened.
- Pour in heavy cream and stock, simmer for 2-3 minutes.
- Fold in lobster meat and peas, simmer for 5 minutes.
- Remove from heat and stir in thyme, lemon juice, salt, and pepper.
- Roll out one pie crust, fit it into a pie dish.
- Spoon filling into crust, cover with second crust, cut slits for steam.
- Brush the top crust with beaten egg.
- Bake for 30-35 minutes until golden brown.
- Cool for 10-15 minutes before serving.
Leave a Reply