
As the sun warms the afternoon and the gentle breeze carries the scent of blooming flowers, thoughts of refreshing desserts spring to mind. That’s where my No-Bake Lemon Cheesecake Mousse Cups come in—a delightful twist on a classic favorite that you can whip up without ever turning on the oven. These airy cups are the perfect blend of creamy texture and zesty lemon flavor, making them an ideal summer dessert for gatherings or simply indulging after a long day. Plus, they come together quickly and require minimal effort—who wouldn’t love an impressive treat that fits seamlessly into warm-weather entertaining? Ready to bring a bit of sunshine to your dessert table? Let’s dive into this delicious recipe!
Why Are No-Bake Desserts So Popular?
Effortless Preparation: No baking required means less fuss in the kitchen. Simply mix, layer, and chill for a stress-free dessert!
Zingy Citrus Flavor: The bright lemon flavor not only refreshes but also adds a delightful twist to the classic cheesecake experience.
Crowd-Pleasing Appeal: Impress your guests at any gathering with these elegant mousse cups that are as beautiful as they are delicious.
Versatile Variations: Make it your own! Substitute with different fruits or crust alternatives to cater to all tastes and dietary needs, just like my Lemon Garlic Parmesan recipe offers flavorful twists.
Quick Chilling Time: Perfect for last-minute gatherings, these mousse cups set in just a couple of hours, giving you more time to relax and enjoy your company.
No-Bake Lemon Cheesecake Mousse Cups Ingredients
• Ready to create a refreshing delight? Here’s what you’ll need!
For the Crust
- Graham Cracker Crumbs – 1 cup, provides the base for a crunchy texture; substitute with digestive biscuits or crushed nuts for gluten-free options.
- Melted Butter – 2 tablespoons, binds the crust together; coconut oil works as a dairy-free alternative.
- Sugar – 1 tablespoon, adds a touch of sweetness; feel free to reduce if you prefer a less sweet crust.
For the Mousse
- Cream Cheese – 8 oz, softened, gives that rich cheesecake flavor; full-fat is recommended for the best consistency.
- Powdered Sugar – ½ cup, sweetens the mousse; consider honey or maple syrup as natural substitutes.
- Vanilla Extract – 1 teaspoon, enhances the overall flavor; pure vanilla extract elevates the taste.
- Lemon Zest – zest of 1 lemon, infuses vibrant citrus notes; fresh zest is far superior to dried or bottled options.
- Fresh Lemon Juice – 2 tablespoons, brightens the flavor profile; use freshly squeezed juice for optimal taste.
- Heavy Whipping Cream – 1 cup, chilled, gives the mousse its light texture; ensure it’s very cold before whipping for best results.
Get ready to impress with these delightful No-Bake Lemon Cheesecake Mousse Cups that’ll be the highlight of your next gathering!
Step‑by‑Step Instructions for No-Bake Lemon Cheesecake Mousse Cups
Step 1: Prepare the Crust
In a mixing bowl, combine 1 cup of graham cracker crumbs, 2 tablespoons of melted butter, and 1 tablespoon of sugar. Stir until the crumbs are evenly coated with butter. Distribute the mixture into small cups or jars, pressing down firmly with the back of a spoon to form a compact crust. Set aside as you prepare the mousse.
Step 2: Make the Mousse Mixture
In a large bowl, beat 8 oz of softened cream cheese with ½ cup of powdered sugar, 1 teaspoon of vanilla extract, the zest of 1 lemon, and 2 tablespoons of fresh lemon juice. Use an electric mixer on medium speed for 2-3 minutes until the mixture is smooth and creamy, ensuring there are no lumps. This vibrant lemon cheesecake mixture will be the heart of your No-Bake Lemon Cheesecake Mousse Cups.
Step 3: Whip the Cream
In a separate, chilled bowl, whip 1 cup of heavy whipping cream until stiff peaks form. This should take about 3-5 minutes on medium-high speed. Once you see the peaks standing tall, your cream is perfectly whipped. This step is crucial for achieving fluffy mousse, so make sure to use very cold cream for the best results.
Step 4: Combine the Mixtures
Gently fold the whipped cream into the cream cheese mixture in batches. Start with a third of the whipped cream, mixing slowly using a spatula to combine without deflating the airiness. Continue adding the remaining whipped cream until fully incorporated, resulting in a light and airy mousse that embodies the essence of No-Bake Lemon Cheesecake Mousse Cups.
Step 5: Fill the Cups
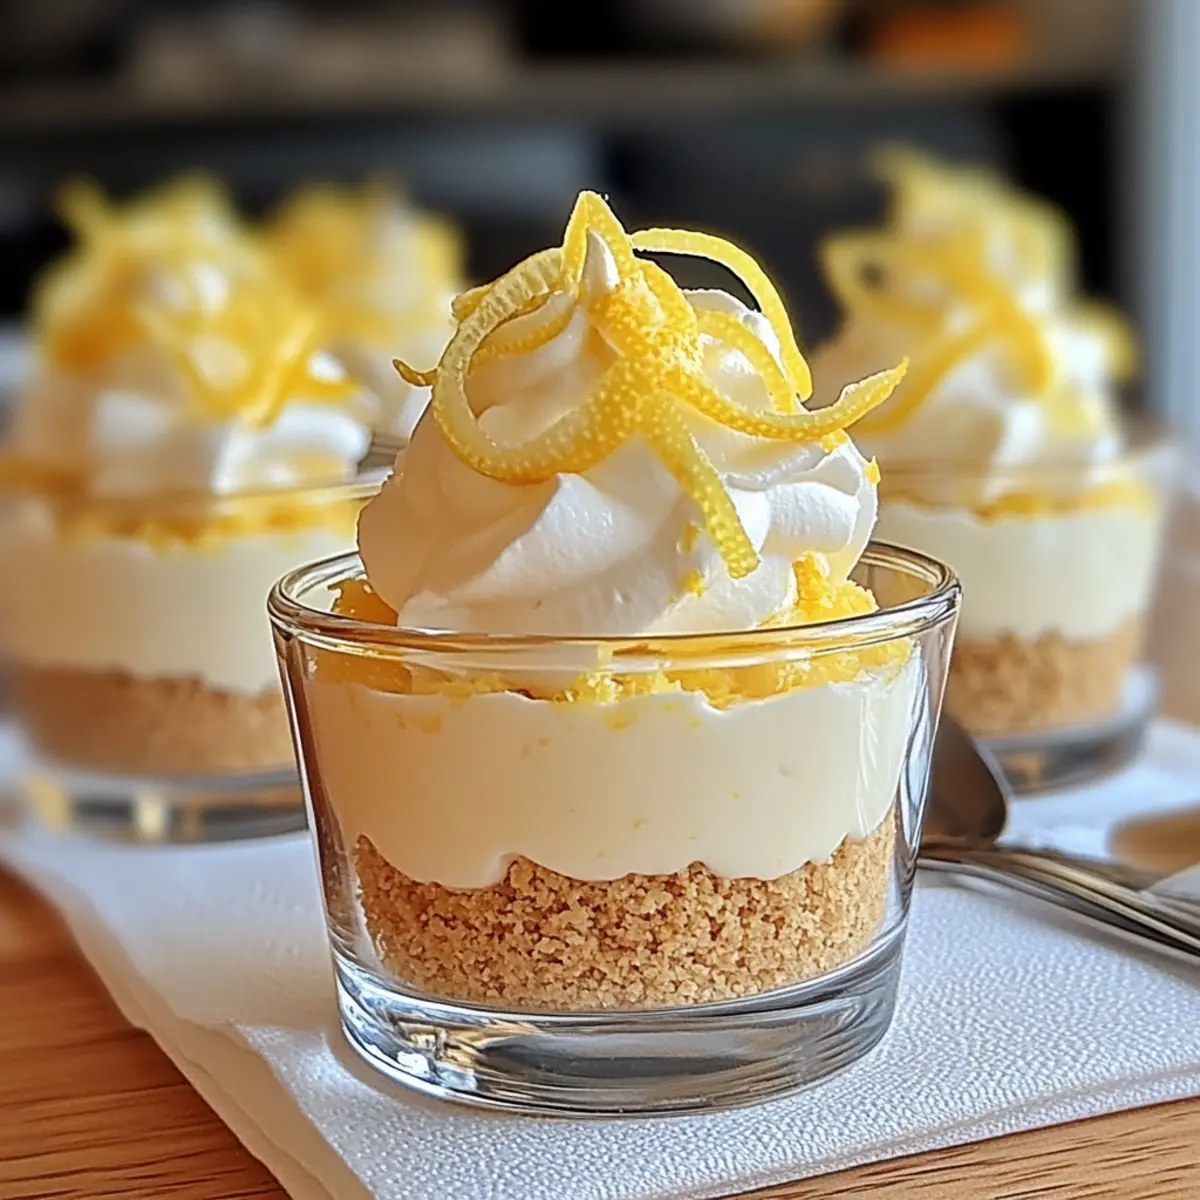
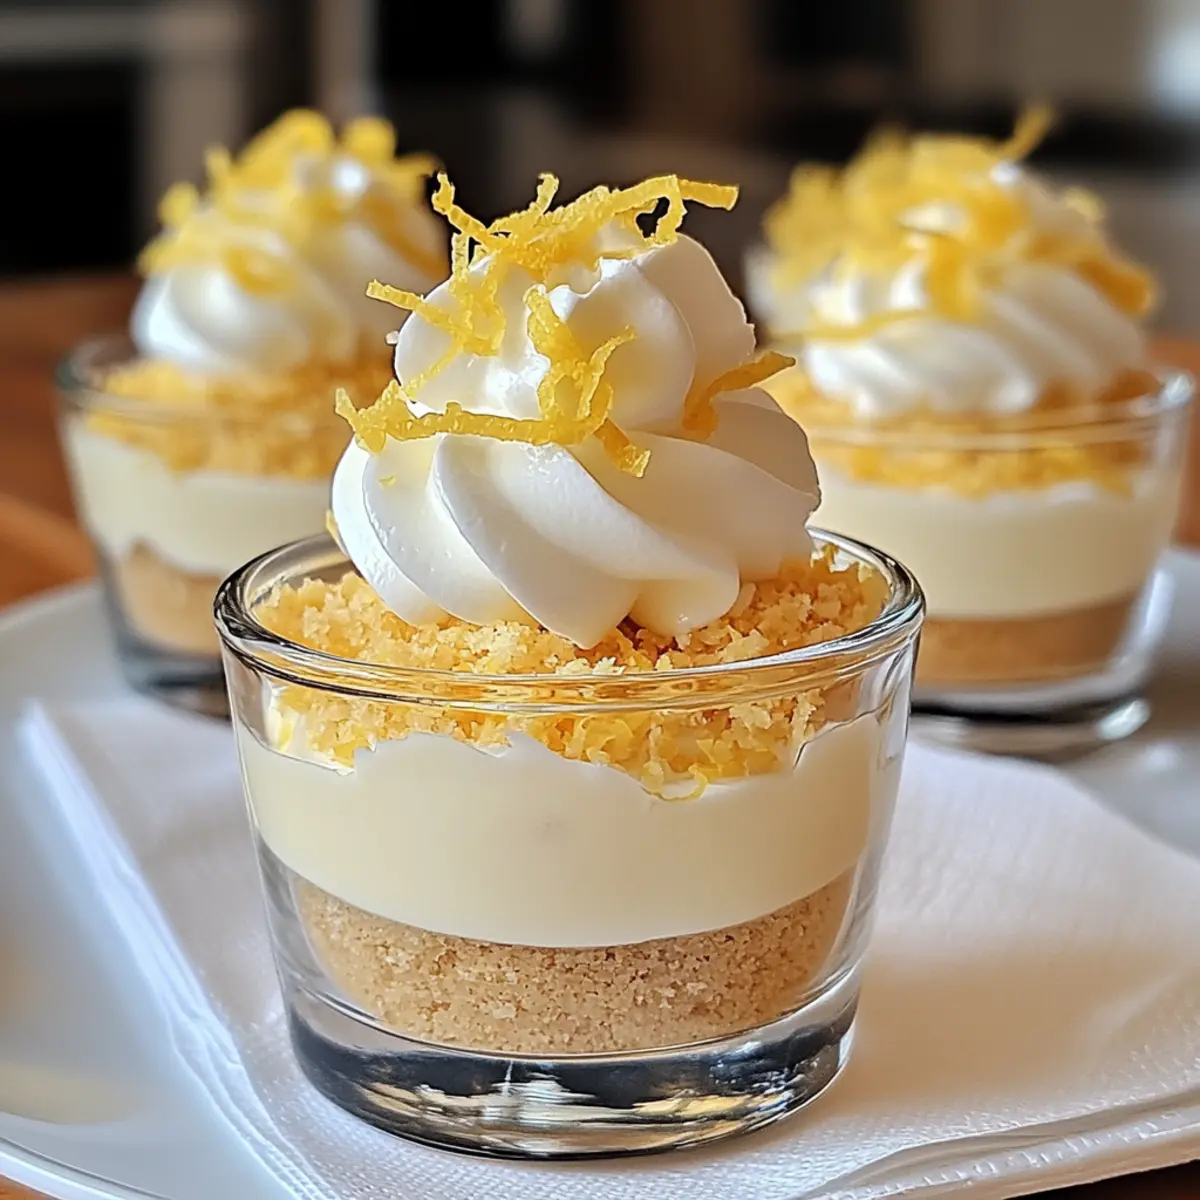
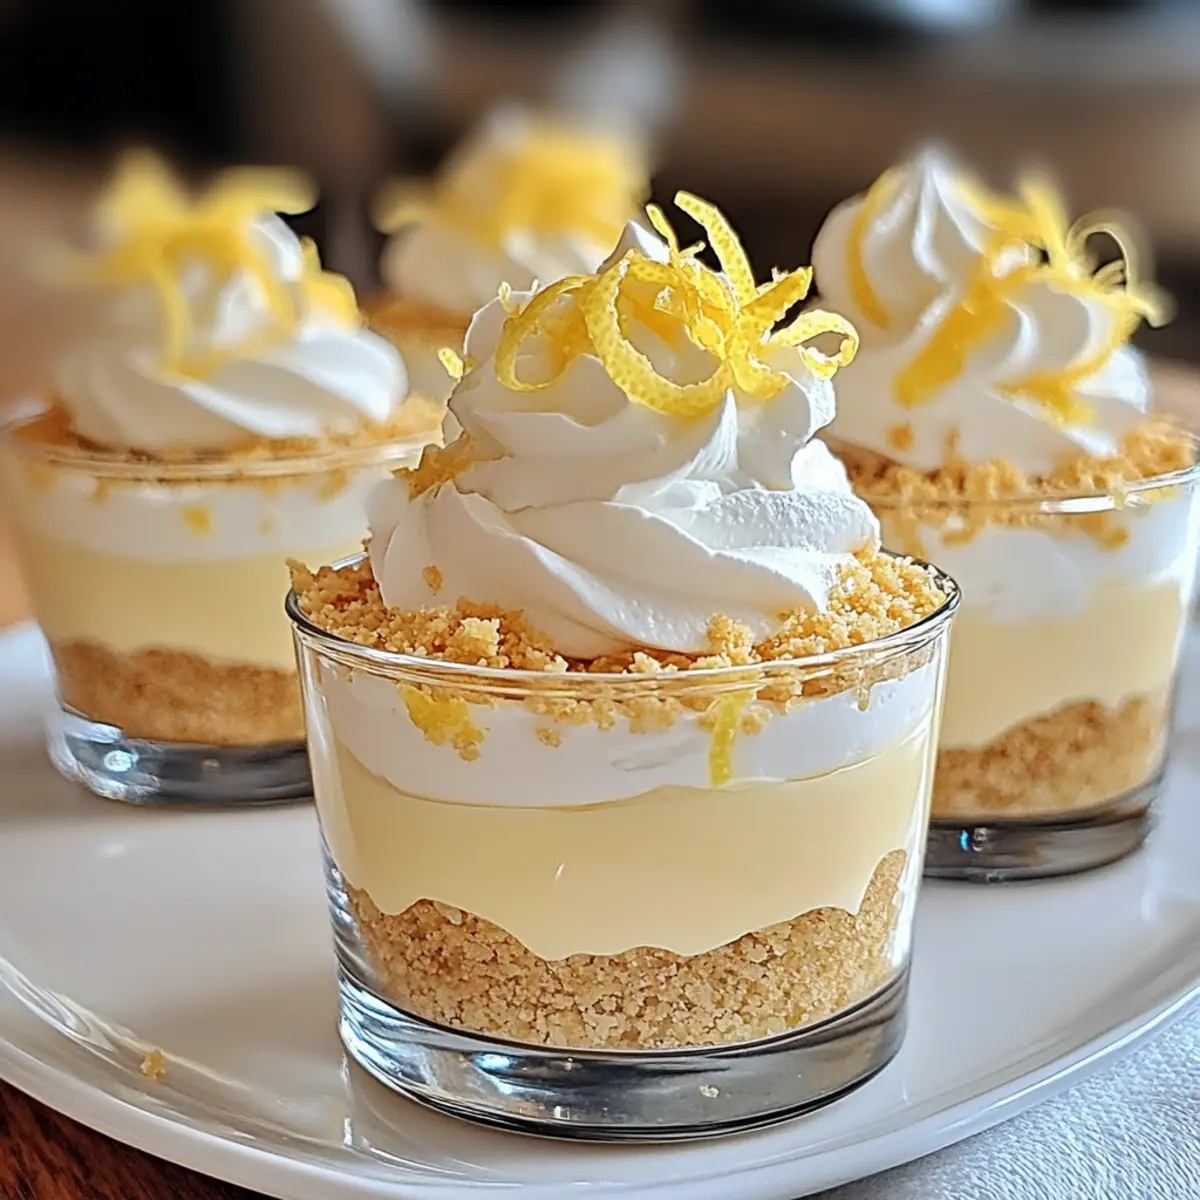
Using a spoon or piping bag, fill each cup with the creamy mousse mixture, smoothing the tops with a spatula. Aim for an even layer above the crust, leaving a little room for garnish later. The delightful contrast of the airy mousse against the crunchy crust sets the stage for your presentation.
Step 6: Chill the Cups
Cover each filled cup with plastic wrap or a lid and refrigerate for at least 2 hours. This chilling time allows the mousse to set properly and enhances the flavors. You’ll know your No-Bake Lemon Cheesecake Mousse Cups are ready when they feel slightly firm to the touch.
Step 7: Garnish & Serve
Before serving, add a dollop of whipped cream on top of each mousse cup, then sprinkle with fresh lemon zest or place a thin lemon slice for a pop of color. For a finishing touch, top with a sprinkle of crushed graham crackers. Each cup is now not only delicious but a treat for the eyes as well!

What to Serve with No-Bake Lemon Cheesecake Mousse Cups
Elevate your dessert experience with delightful pairings that bring out the best in these refreshing mousse cups!
- Zesty Lemon Sorbet: A bright and tangy sorbet that complements the creamy mousse, adding a refreshing burst of flavor with each bite.
- Fresh Berries Medley: Strawberries, blueberries, and raspberries add vibrant color and fruity sweetness that contrasts beautifully with the rich cheesecake flavor. Their acidity balances the creaminess perfectly.
- Homemade Whipped Cream: A simple topping made with just cream and sugar enhances the mousse’s airy texture while adding a luscious finish—it’s the perfect accompaniment!
- Mint Tea: The light herbal notes of mint tea create a soothing experience, making it an ideal beverage pairing that refreshes the palate. Serve it chilled for an uplifting option alongside your mousse cups.
- Chocolate Biscotti: These crunchy, cocoa-rich treats bring a delightful texture contrast while the bittersweet notes enhance the mousse’s sweetness. A unique pairing that rounds out a perfect dessert spread!
- Coconut Macaroons: Chewy and sweet, these coconut delights tie in a tropical flair that complements the lemon flavors. Their slight crunch contrasts nicely with the creamy mousse.
Whichever combination you choose, your No-Bake Lemon Cheesecake Mousse Cups will shine at any gathering!
No-Bake Lemon Cheesecake Mousse Cups Variations
Get ready to inspire your creativity in the kitchen with these fantastic twists on a luscious classic!
-
Mascarpone Swap: Replace cream cheese with mascarpone for an extra rich and creamy texture that will make your mousse even more indulgent.
-
Citrus Twist: Switch up the lemon flavor by using lime or orange juice and zest instead! Each citrus brings its unique zest and brightness, creating a refreshing flavor twist that’ll wow your guests.
-
Berry Delight: Layer fresh berries or a luscious fruit compote between the mousse layers for added color and fresh flavor. Strawberries or blueberries meld beautifully with lemon, creating a delightful taste experience!
-
Nutty Crust: Use crushed almonds or pecans instead of graham crackers for a crunchy, gluten-free crust. The nutty flavor pairs deliciously with the creamy mousse, adding a unique texture too!
-
Sweetener Options: Instead of powdered sugar, use maple syrup or agave nectar for a more natural sweetener. This will lend a hint of flavor while lightening the sweetness of the mousse.
-
Herbal Infusion: Infuse your mousse with a touch of fresh herbs like basil or mint by incorporating finely chopped leaves into the mixture. This unexpected addition brings an aromatic lift to every spoonful!
-
Heat It Up: For a spicy kick, stir in a pinch of cayenne or chili powder into the mousse. It’s a surprising combination with lemon and adds a delightful warmth that awakens the palate.
-
No-Bake Chocolate Version: Add melted chocolate into the mousse for a delicious fusion. A layer of chocolate mousse beneath the lemon mousse is a heavenly pairing, reminiscent of my delectable No-Bake Chocolate Peanut Butter Oat Bars.
Feel free to mix and match these variations to craft your perfect No-Bake Lemon Cheesecake Mousse Cups, tailored to your family’s tastes and preferences!
Make Ahead Options
These No-Bake Lemon Cheesecake Mousse Cups are a fantastic choice for meal prep, saving you time and stress on busy days! You can prepare the mousse mixture and the graham cracker crust up to 24 hours in advance. Simply follow the instructions to make the mousse and crust, then cover each cup tightly with plastic wrap or a lid and refrigerate. To ensure the mousse stays light and fluffy, fold the whipped cream just before filling the cups. When it’s time to serve, simply add a dollop of whipped cream and garnish with lemon zest or slices. Your delightful dessert will be just as delicious and ready to impress!
Expert Tips for No-Bake Lemon Cheesecake Mousse Cups
-
Soften Cream Cheese: Ensure your cream cheese is completely softened to prevent lumps in the mousse, achieving that smooth, creamy texture loved in No-Bake Lemon Cheesecake Mousse Cups.
-
Chilled Ingredients: Use chilled heavy whipping cream for optimal volume when whipping. Cold cream whips better, giving your mousse a light and fluffy consistency.
-
Gentle Folding: Fold the whipped cream gently into the cheesecake mixture to maintain airiness. This technique helps create those delightful layers in your mousse cups.
-
Taste as You Go: Adjust sugar levels according to your taste preference. Starting with the recommended amounts allows you to customize the sweetness of your No-Bake Lemon Cheesecake Mousse Cups.
-
Creative Garnishing: Experiment with different toppings like fresh berries or mint leaves. They not only enhance presentation but also add flavor contrasts that delight the palate.
How to Store and Freeze No-Bake Lemon Cheesecake Mousse Cups
-
Fridge: Store your mousse cups in the refrigerator, tightly covered, for up to 3 days. This keeps them fresh while retaining their creamy texture and zesty flavor.
-
Freezer: While not recommended for long-term storage, you can freeze the mousse cups for up to 1 month. Be sure to wrap them well to prevent freezer burn, but the texture may change slightly upon thawing.
-
Thawing: To enjoy frozen mousse cups, transfer them to the fridge and allow them to thaw overnight. This gentle method helps preserve the mousse’s airy qualities.
-
Reheating: Reheating is not necessary for mousse cups; they are best served cold. If stored properly, they will be just as refreshing and delightful when served after chilling.
No-Bake Lemon Cheesecake Mousse Cups Recipe FAQs
What should I look for when selecting lemons?
Absolutely! When choosing lemons, opt for those that are firm and heavy for their size. The skin should have a bright yellow hue with minimal blemishes. Avoid lemons with dark spots all over, as this indicates overripeness. Fresh lemons provide the best flavor and juice for your mousse cups.
How should I store the No-Bake Lemon Cheesecake Mousse Cups?
Store your mousse cups in the refrigerator, covered tightly, for up to 3 days. This will keep them fresh while preserving their creamy texture and zesty flavor. If you plan to make them in advance, they can also be prepared a day ahead of serving for convenience!
Can I freeze the mousse cups for later enjoyment?
While it’s not the best choice for long-term storage, you can indeed freeze the mousse cups for up to 1 month. Just wrap each cup tightly in plastic wrap and then place them in an airtight container to prevent freezer burn. When you’re ready to enjoy them, thaw them in the refrigerator overnight for the best texture.
What if my mousse is too runny after mixing?
Very! If your mousse seems too runny, it might be due to under-whipped cream or not incorporating the whipped cream gently enough. Make sure your cream is whipped to stiff peaks and try folding it carefully into the cream cheese mixture. If it’s still too soft, you can add a teaspoon of dissolved unflavored gelatin to the mousse mixture before filling the cups for additional stability.
Are there any dietary considerations I should keep in mind?
Of course! If you have dietary restrictions, consider substituting the heavy cream with half Greek yogurt for a lighter mousse, while still keeping that luscious texture. Additionally, make sure your cream cheese is gluten-free if serving to someone with gluten sensitivities. Enjoy these mousse cups worry-free!
How far ahead can I make the No-Bake Lemon Cheesecake Mousse Cups?
I often make these cups the day before a gathering! They can be prepared a day in advance and will chill beautifully in the refrigerator, allowing the flavors to meld and the mousse to set perfectly. Just be sure to cover them tightly to maintain freshness!
Irresistible No-Bake Lemon Cheesecake Mousse Cups
Ingredients
Equipment
Method
- In a mixing bowl, combine graham cracker crumbs, melted butter, and sugar. Stir until the crumbs are evenly coated with butter. Distribute into small cups, pressing down firmly to form a compact crust. Set aside.
- In a large bowl, beat softened cream cheese with powdered sugar, vanilla extract, lemon zest, and fresh lemon juice using an electric mixer on medium speed for 2-3 minutes until smooth and creamy.
- In a chilled bowl, whip heavy whipping cream until stiff peaks form, taking about 3-5 minutes on medium-high speed.
- Gently fold whipped cream into the cream cheese mixture in batches, combining slowly with a spatula to maintain airiness.
- Using a spoon or piping bag, fill each cup with the mousse mixture and smooth the tops with a spatula.
- Cover each cup and refrigerate for at least 2 hours to allow the mousse to set properly.
- Before serving, garnish with whipped cream, fresh lemon zest, or a lemon slice and a sprinkle of crushed graham crackers.
Leave a Reply